Tag Archive for: vintage

Vintage Gloves

Grandma blessed me with several pairs of her fancy gloves.
I love slipping my hands into the soft fabric and prancing about the house, pretending that I am a proper lady.
I envision myself as Audrey Hepburn or Grace Kelly.
What happened to women like that?

I might try to start a new trend of glove wearing. These are just too dang cute to leave sitting in my dresser drawer.


And, they compliment all of my vintage dresses. I think gloves would be rather cute with the right purse, heels and a vintage dress.
I think the public is ready for gloves to come back into fashion.


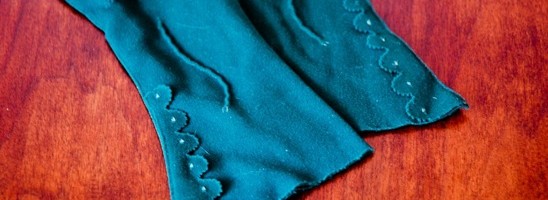
This soft yellow pair is my favorite. I just love the detailing around the bottom.


Wearing the gloves thrust me into doing everything in a very dramatic way.
I walk with my head held high, saying things to Biceps like, ‘Oh, Dahling!,’ and ‘If only you knew how very much I love you,’ while batting my eyelashes incessantly.
It’s probably best that I don’t wear these out in public, on second thought.

Read more

Mod Log Table

I have been dreaming of an outdoor end table for quite some time. When my neighbor decided to chop down his very dead pine tree, the opportunity afforded itself.
I love neighbors with chainsaws.
Here’s a view of the finished Mod Log Table. Yes, it’s inside my house. No, it hasn’t spent a day outside yet. I think it’s kind’ve pretty inside…


In order to make your own Mod Log Table, you’ll need a dead tree-preferably very dead. I hopped the fence into my neighbors yard and picked out my victim from amongst the carnage laying before me.


I let my Little Mini chainsaw rest while I borrowed the neighbor’s beefier chainsaw. I tried to make the cut as even as possible, knowing I would have to sand down any high points on the wood later on.


I had some vintage legs laying around, but you can use pre-made legs that you can buy at Lowe’s. You’ll also want lag screws to fasten your legs to the log, polyurethane, a foamy brush, and gloves. You’ll want some steel wool & a microfiber cloth for in between your poly layers.


You’ll need a drill with a drill bit slightly smaller than your lag screw and a belt sander with 40 & 80 grit sandpaper, a socket set and a level(not pictured-sorry!).


Sand the top and bottom of your log until it’s smooth, starting with the 40 grit. Use the 80 grit for your fine sand.
That’s fine, baby, that’s fine….


Once your log is smooth, use small set screws to temporarily attach the legs to the underside of the log. Outline the table legs (so when you remove them later on, you’ll know where they go) and flip your table over to check for it being level.


Using your level as shown, ‘shim’ up your table leg until the table sits level. Measure the amount you will either need to router out of the underside of your table, or shim up with scrap plywood.
Or you can choose to sand it even more until your shoulder falls off.
Flip your table back over and remove the legs.


I cut out pieces of plywood with a jigsaw to make up the difference I had measured earlier in order for the table to be level. I chose to shim up my legs, mainly because I do not own a router. This doesn’t look quite as finished, but for an outside table, I was ok with it.


Drill pilot holes for your lag screws or for your pre-made table legs using a drill bit that is slightly smaller than the screw you’ll be using.


Use a socket set to insert your lag screws, if you have legs like mine (tee hee). If you have pre-made legs with the screw already sticking out of the end, just screw them into where you drilled your pilot holes.


Wipe the table down with a microfiber cloth-get all the nooks and crannies. Now it’s time to make it pretty! Enough of the functional stuff. WOO-HOO!


Apply your first layer of polyurethane and let dry according to the manufacturer’s instructions. It’ll be so purty when you’re done with the first layer!


Use your steel wool to get any of the bubbles out by ‘sanding’ it lightly.


Use your steel wool to get any of the bubbles out by ‘sanding’ it lightly.
Wipe the entire thing down again with your microfiber cloth. Apply another coat of poly and let dry.


You now have such a cute table, you may not be able to bring yourself to put it outside. Mine hasn’t made it outside yet. I keep telling myself to let go…but I’m worried it will be lonely outside…

Read more

Getting to know you, Grandma

Due to a devastating fire that happened years ago, many of the photographic memories from my mom’s side of the family went up in smoke. My sweet Aunt has a few remaining pictures of the family and has recently been sharing them with me-‘her favorite niece’.
(Note: I am her only niece…)

My Grandpa (my mom’s dad) is the man on the right wearing the ‘old man onesy’. Grandpa didn’t mess about when it came to fishing. Nor when it came to love. Grandpa was madly in love with my Grandma. But she passed away at the age of 53. I was only three at the time-I don’t even remember what her voice sounded like. And up until yesterday, I had only one picture of my Grandma.


I see where I get my sass from and my love for men’s oversized flannel shirts.


My Grandmother looks classy and so full of life. We would have gotten along famously, I am sure.
Because of these photos, I feel a bit of a connection to the woman I never knew. I feel my Grandmother would understand my weird spiciness.
Or at least pretended to understand..but at any rate, I would have another ally on my side. And I need all the help I can get.

Read more

Sew Vintage Blank Note Cards

Biceps owned several vintage postcards P.R. (pre-Rebekah).
Neither of us knew what to do with them, and we revered them too much to actually use them as postcards.
But things are meant to be used in a practical way and not made to look at and clutter up my desk drawers.

Stitching Bicep’s vintage postcards onto card stock seemed like the next logical step in my strange brain.
You can do this with old photos, as well. As long as they’re weird. That’s my only stipulation.


Here’s what you’ll need to make your very own ‘Sew Vintage Cards’:
Old, weird photos or postcards
Vibrant colored thread
Scissors
8.5 x 11 Card Stock or pre-made blank notecards
Sewing Machine
‘Jean Needle’ (100/16)
Envelopes 3.5” x 5”
Pen
Ruler


If you don’t have pre-made blank notecards on tap, use card stock and make your own.
Fold your card stock in half and draw a line down the middle using your pen and ruler. Cut your card stock in half, making sure it fits inside of your envelope.


Dust off your sewing machine, slap in your heavy duty ‘Jean Needle’ and choose your favorite decorative stitch.


Test the look of several different types of stitches on a piece of cardboard, just to see what you are getting yourself into.
Once you’ve decided on a pattern you like, temporarily tape your photo/postcard to the card stock or your pre-made fancy note card with scotch tape.


Tack down two opposing sides of the photo/postcard with your preferred stitching method to prevent it from sliding around.


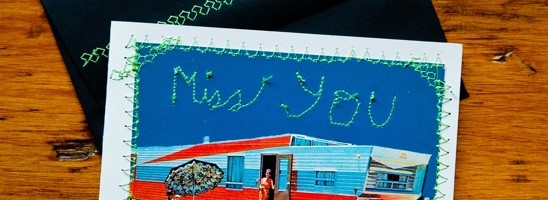
Sew around the entire perimeter of the photo/postcard, changing up the decorative stitch if you feel so inclined.


Using a straight stitch, take your time slowly stitching whatever crazy phrase comes to mind that compliments the picture. I thought that the phrase, ‘Miss You’ seemed appropriate.
Don’t get picky, get weird.


Decorate the flap of your envelope with a decorative stitch, as well.
Finally, choose someone you really love that deserves such a cool hand-crafted card. Sending them this piece of snail mail will surely impress them and make them have warm fuzzies.
If you need my address, just let me know….

Read more