Tag Archive for: shirt

Easy Lace Cape-Shirt

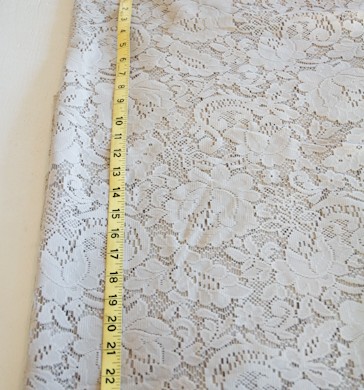
My lovely sis-in-law gave to me a set of lace curtains that she could no longer use. What’s a girl to do but make a shirt from them? (This idea works fine with a lace tablecloth, too.)


Within an hour or so, I had a sweet new shirt that goes with just about anything. This may seem like a lot of steps, but it’s just that I’m a little overboard on details, sometimes.


Here’s what you’ll need to make your very own Lace Cape-Shirt:

Fabric Lace-at least 40″ in width, 25″ in length
Thread to match
Scissors
Tape Measure
Straight Pins
Sewing Machine
Heat ‘n Bond Tape
Iron
Lace Edging


First, fold the material in half from top to bottom.
Then fold the material in half from the left side to the right side.
To make the circle that will be your cape, begin by measuring 20″ from the corner fold across the top fold. Place a straight pin at the 20″ mark.
 

Measure 24 1/2″ from the corner fold down the side fold. Place a straight pin at the 24 1/2″ mark.


At a 45 degree angle from the corner fold, measure out 23″. Place a straight pin at the 23″ mark.
Alternately on either side of the 45 degree angle, measure 20 1/2″ at a 22 1/2 degree angle, and 24″ at a 67 1/2 degree angle.


Following your pin marks, cut out the quarter circle shape.


At the corner fold, measure down 2″ and across 2″. Cut out the tiny quarter circle shape. This will be the start of the neck hole.


Unfold the quarter circle to the left, leaving the top folded. This should now be the bottom half of a circle.
Measure and pin 6 1/2″ across the top fold of the lace, centered over the 2″ mark already cut for the neck hole. Increase the neck hole by cutting along these guides making the hole now 6 1/2″ wide.


Measure 2″ down from the already snipped portion of the fabric on only ONE side of the shirt. To increase the neck hole on only the FRONT side of the shirt, deepen the plunge the additional 2″.
Leave the back side of the shirt as is.


With the front of the shirt folded to once again create the quarter circle, measure down from center 4″.


Cut the 4″ slit on ONLY the front side of the shirt.


I used a hem stitch to finish off all of the edges of my lace. You can do whatever you want, but this seemed to work the best for me. So there.


Sew all of the edges on the shirt, including the neck hole.


Once all of your edges are sewn, fold the shirt once more with the neck hole in the front, a fold across the top, creating the bottom of a circle.
On each side, measure 10″ in across the top fold and pin (yellow pin in picture). Then measure from that pin 13″ down and pin (white pin). From that pin, measure back towards the edge 7 1/2″ (pink pin).
(This shouldn’t change the location of the 13″ pin, it’s just a double check that you measured correctly).
Sew two 1/4″ “stays” at the 13″ mark with a quick zig-zag stitch through both pieces of material. This will keep the cape in the right place on the body.


I decided to trim out the neck hole with lace edging. I followed the package directions on the Heat ‘n Bond to apply the edging to the shirt.


I liked using a darker color to offset the gray lace. But, the same color of lace would be just as pretty to make a plainer shirt.


Tah-dah! That’s all there is to it. Slip the Lace Cape-Shirt on over a bold colored cami and call it a day. Below is the back of the shirt.


Simple. Cute. Cheap. Fun.
That’s the way I like my crafts (or crap, whatever…).

Read more

Sassy Military Up-Cycle Shirt

A few too many plain t-shirts are junking up my closet. When wearing a plain tee-I feel as if I am blending into the crowd. Today was the day to ‘Sassify’ one of my old boring t-shirts. I spent less than an hour of my day and used scraps of materials, turning this ‘yawner’ into a ‘take notice’.

This t-shirt is a nod to my Dad and the military blood that is running through my veins.
Having a father that is a Retired Lieutenant Colonel and a West Point Graduate influences much of my daily life-and now my clothing apparently…
I added little button details on the front and the back, just for a little more sass.


Here’s what you’ll need to ‘Sassify’ your own plain t-shirt:
Scraps of material (I would recommend using felt in a bold color)
Heat n Bond
Scissors
Tape measure
Seam Ripper
Iron & Ironing board


Using your scraps of material, pick out your style for your new shirt.
I decided on a simple stripe and used sparkly red felt (so that I wouldn’t have to seam the ends) on a deep purple shirt. But I say, ‘Get crazy!’ Make different colors of flowers, a bird, a cactus…whatever the heck comes to mind.


Apply your Heat n Bond according to the package directions. Iron that sucker in place and let cool.


After adding my stripe to the front of the shirt, I decided the tiny pocket needed a little something too. I added this geometric shape using the same Heat n Bond technique.


Lastly, I added a swatch that rests on the small of my back. I used Heat n Bond once again to attach it to the shirt. Next, I added buttons to give it that ‘military look’.


Here is a close up on the buttons that I added to the front of the shirt.
Snazzy and so easy.


Once more, here is the final product that set me back less than $1. And below is the back of the shirt.


I am so happy that this little ditty has a new life. It was headed for the garage sale pile, and now it’s my sassy go-to shirt when needed.
My Dad would be so proud.

Read more

Sassy ‘Dress Shirt’

Typically the vintage dresses I come across have been ripped, stained or eaten by evil moths. Instead of parting with the abused garment, I hide the problem areas with a little creativity and turn it into a sassy
one-of-a-kind shirt.

This is what my finished product looked like, but each ‘Sassy Dress Shirt’ will be unique! Read on to learn how to make your very own ‘Sassy Dress Shirt’.


What you will need:
An old dress
Seam Ripper
Iron & Ironing Board
Straight Pins
Sewing Machine
Ribbon to match the dress (if desired to cover holes, etc)


Assess how long you would like your ‘shirt’ to be and cut the excess off, leaving about two inches for hemming. I don’t subscribe to the midriff look from the late 90‘s, so I hem my ‘shirt’ to fall a couple inches below my hip bone.


Turn your ‘shirt’ inside out and measure your hem all the way around, pressing and pinning it as you go. Sew your new hem with a blind hem stitch or whatever you normally fancy when you hem something up.


If you have ribbon or embellishments that match your new ‘shirt’, now is the time to hide those stains or moth holes. No one will be the wiser! In the past, I’ve made little fabric flowers out of the left over material to cover the problem areas.


For this shirt, I removed the ribbon that was once around the bottom hem of my dress to cover over a stain on the front, following the neckline.


I opened the seam where the zipper stopped on the backside and followed that opening with more ribbon. This allowed me a little more booty shakin’ room.
Sew all of your ribbon and your embellishments in place.


Here’s my backside… of the shirt. What were you thinking I meant? Scroll down to see the front again.


Ta-Dah! I love wearing this cute little number out on the town. Let me know if you try making your own Sassy Dress Shirt. I would love to see how yours turns out!

Read more