Tag Archive for: garden

DIY Spinning Composter-Video Only

I wrote a post a few weeks ago outlining how to make a DIY Spinning Composter. I had such a huge response from this particular project, that Biceps and I decided it needed a video to go along with it.

And here’s a little excerpt from that tutorial on my DIY Spinning Composter:

This year was my first year for a full-fledged garden. I consider it full-fledged because it produced enough to not only feed Biceps and I, but it also allowed me to dehydrate, freeze and give-away the excess.To be honest, I was just happy that anything sprouted from the earth.

I give props to the composted kitchen and yard waste that we added to the soil-this garden seemed to outperform many of my neighbors’ gardens.

And just in case you don’t want to go spend your hard earned dollars buying a fancy composter in excess of $100 bucks or more, I thought I would show you how to make your own using some recycled and some store bought materials for about $30 in a matter of hours.

If you’d like to see step by step instructions, along with photographs, here’s the link to my DIY Spinning Composter.


Read more

DIY Spinning Composter

This year was my first year for a full-fledged garden. I consider it full-fledged because it produced enough to not only feed Biceps and I, but it also allowed me to dehydrate, freeze and give-away the excess.

To be honest, I was just happy that anything sprouted from the earth.

I give props to the composted kitchen and yard waste that we added to the soil-this garden seemed to outperform many of my neighbors’ gardens.
And just in case you don’t want to go spend your hard earned dollars buying a fancy composter in excess of $100 bucks or more, I thought I would show you how to make your own using some recycled and some store bought materials for about $30 in a matter of hours.

(Here’s my video for my DIY Spinning Composter.)


Here’s what you’ll need for your very own composter (The store bought materials can all be found at Lowe’s):

Food Safe Barrel of some sort (I used a leftover crazy person’s 40ish gallon Y2K water barrel they had in their basement in preparation for the end of the world)
3″ ABS toilet flange (I used an Oatey brand for $3.60)
3″ PVC pipe (I bought a 10′ stick-that’s the smallest they had for $10)
3″ PVC cap ($.72)
(2) 2 x 6 x 10 pressure treated lumber (~10′ for $6.97) and pressure treated wood screws (about 20 or so)
(2) hinges with appropriate sized bolts and nuts-don’t use the screws in the package that comes with them (Gatehouse brand 3 1/2″ Butt/Mortise hinges for $2.78 each)
(1) window sash latch with appropriate sized bolts and nuts-don’t use the screws in the package that comes with them (Gatehouse brand for $3.59)
(1) galvanized pipe (I re-purposed a closet rod-1″ diameter and about 4′ length, but if you have to buy one, they are about $5-7)
(8) wood screws 1 1/2″ ish (I used leftovers found in my coffee can full of excess screw, but you may spend $.50)


Here are the tools you will need to complete the project:

Square
Skill Saw with wood blade
Drill with 5/16″ drill bit, hole saw slightly bigger than your galvanized pipe/closet rod
Fine grit sandpaper
Chop Saw
Old screen from window
Tins Snips to cut screen
Flat head & Phillips head screwdriver
Hammer

Let’s get started!


Determine which end is up for you and your barrel. On your “up” end, use your skill saw to cut out a lid in a semi-circle shape (half of the entire circle).


This is what the lid will look like when you are done cutting it out. Sand off any burrs.


Pre-drill the holes for the hinges and the latch. Sand off any burrs. Attach the hardware, using the bolts and nuts (bolts on the outside, nuts inside).
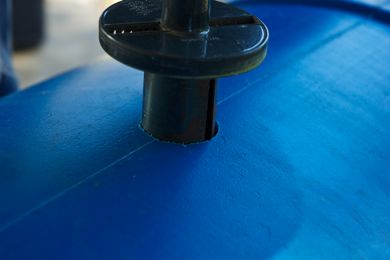


Attach the hole saw to your drill and measure halfway down on each side of your barrel, starting on either side of the lid. The holes should be drilled so that the closet rod will run parallel to the lid. Sand off any burrs.


Drill holes for your closet rod to go through. Insert the closet rod to make sure the barrel can be easily turned. If not, increase the diameter of the hole slightly.
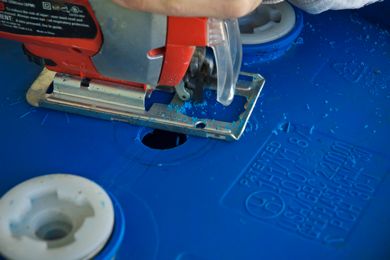


On the bottom of your barrel, trace the 3″ opening for the toilet flange using a sharpee in the center. Cut out the circle with your skill saw and wood blade. Sand off any burrs.


Insert the toilet flange to the outside of the barrel and make sure it fits snugly.


Cut out enough screen to cover the bottom of the opening in the flange. Pre-drill holes in order to screw the flange to the barrel and the screen to the flange.


Remove the closet rod from the barrel and place the PVC pipe vertically in the barrel, fitting it over the toilet flange. Cut the 3″ PVC pipe to fit vertically inside of your barrel, leaving about 6″ headspace between the top of the pipe and the opening of the composter. Place the 3″ cap on top of the pipe.
Mark where the curtain rod will meet with the PVC pipe.


Using your drill with the 5/16″ bit, drill holes several inches apart in the PVC pipe. Using the hole saw, drill two holes in the PVC pipe for the curtain rod to go through.


Using the same 5/16″ drill bit, drill holes vertically in the barrel, about 2″ apart vertically and 6″ apart horizontally.


Cut two identical “legs” for the composter using your chop saw and the pressure treated wood. Begin by measuring from the side of the barrel to center, adding 1 foot to the measurement. For each “leg”, measure 2″ down from one of the cut ends, center the hole saw to cut a circle for the curtain rod to go through.


Cut four identical lengths of wood (mine were about 2′ each in length) to secure the legs to. Attach with the pressure treated wood screws as you see here. I got fancy and cut the corners off of the base pieces. You don’t have to, it doesn’t affect the functionality of the composter.


I added spacers in between the pressure treated wood and the barrel to keep the curtain rod in place. They were just bits of pvc pipe that fit around the curtain rod, cut to about 2″ in length.


Give it a spin and see how much fun making your own compost will be.
Begin collecting all of your kitchen scraps: veggie/fruit peels and scraps, egg shells, coffee filters & grounds, etc (no meat, eggs or dairy) and throw it all in your barrel with dried leaves, grass and yard waste with a ratio of 1 (kitchen waste) to 2 (yard waste). Turn the barrel once a week and keep it as moist as a damp sponge by adding water when needed. (I save old coffee, rinse/rain water, etc. to moisten up the compost).
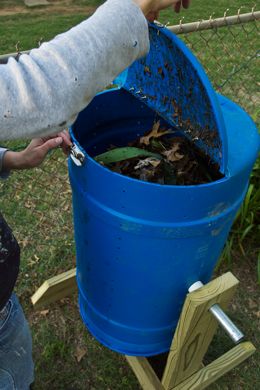


It’s ready to be used in the garden when the compost smells like heavenly dirt and is black and crumbly. Your plants will thank you so much for this yummy concoction…

Read more

Arts & Crap Changes!

I’m back!
Sing it from the mountain tops! After 8 months of being gone from the blogging world, I am finally back up and running. I didn’t choose to be away, fate chose it for me. It was a rough loss for me back in January when my blog failed via the platform, Iweb.

If I could cut Iweb in two, I would.
Or at least pinky shear the programmer’s button up short sleeved shirts.


I had built the site myself in Iweb and for some reason, after a year of blogging with that platform, Iweb decided it had had enough. The ability to update my site, add posts, change anything, was a distant memory.


I pinched my pennies for several months and hired a web designer to build my site (correctly) for me. Once the framework was in place, I had the duties of importing all of my old posts-a task that required copy and pasting each bit of text, each picture, each title…you get the idea. I lost some of my “pretties”, but sacrifices had to be made.

I have a few exciting things to catch you up on from my eight months of absence. I’ll be expanding on each of these items over the next couple of months. But, I thought you’d like a bit of an overview to wet the ol appetite.

So, here are a few changes that have gone on since you last heard from me:


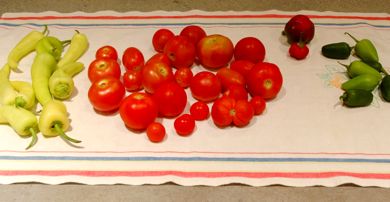
I planted my first full-fledged garden this year. The harvest included, but is not limited to: green beans, spinach, tomatoes, dill, basil, zucchini, yellow squash, potatoes, red and white onions, carrots and tons of peppers…
I’ll share with you some organic and natural ways to keep pests away from your garden, ways to improve the quality of your soil and cheap things you can use to stake up your plants.


I, with the help of Biceps, built a composter for my garden-one that spins ’round and round. It’s a lot of fun to watch it go “round and round”….and to watch it help my plants grow big and strong. I save all of the kitchen scraps and yard waste, throw it in the barrel and give it a push. I’ll teach you how to make your very own.


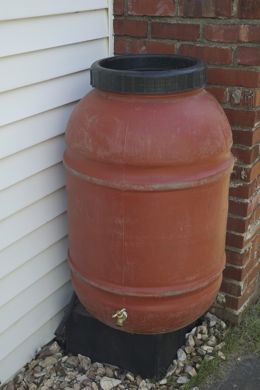
I also made two rain barrels to capture the water running off of our roofs. Did you know that 1″ of rain on an average sized roof (1500 sq ft) can equal 900 gallons of usable water? That’s a lot of water….

There’s plenty more where that came from, but no need to cram everything in. I’ll be sharing with you each of these tutorials with step-by-step instructions, along with pretty photos.

I am ecstatic to be back in the saddle again. The crafting saddle, that is.

Read more

The Home Life Changes!

I’m back!
After 8 months of being away from blogging-I’m back ladies and gentlemen. I didn’t choose to be away, fate chose it for me. It was a rough loss for me back in January when my blog failed via the platform, Iweb.

I wanted to take this sledgehammer and smash Iweb’s face with it. Small problem-not sure where to find Iweb’s face.


I had built the site myself in Iweb and for some reason, after a year of blogging with that platform, Iweb decided it had had enough. The ability to update my site, add posts, change anything, was a distant memory.


I pinched my pennies for several months and hired a web designer to build my site (correctly) for me. Once the framework was in place, I had the duties of importing all of my old posts-a task that required copy and pasting each bit of text, each picture, each title…you get the idea. I lost some of my “pretties”, but sacrifices had to be made.


I have a few exciting things to catch you up on from my eight months of absence. I’ll be expanding on each of these items over the next couple of months. But, I thought you’d like a bit of an overview to wet the ol appetite.


THE BIG CHANGES ‘ROUND HAR (HERE):


I remodeled the Master Bedroom while Bicep’s was away making momma some money.


I also remodeled our Master Bathroom the next time he left for tour.


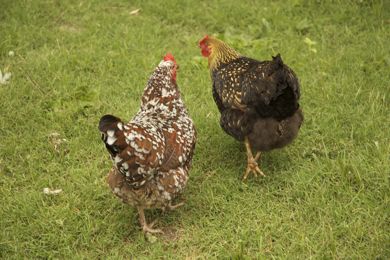
I got really interested in raising chickens in my backyard-so much so that I wrote an article about Urban Chicken Farming for the online and print paper, This Land Press. It’s the same paper that I have my bi-monthly column, “Together in Tulsa” in.


I planted my first full-fledged garden this year-inciting me to can, freeze, dehydrate and make new and exciting dishes like zucchini boats and squash pizza.


Cowboy, my sweet buddy of a cat, passed away. He died of renal kidney failure, compounded with a heart murmur. He was only eight, and I believe way too young. I wasn’t expecting how much this would affect me, but it certainly did.


I believe Cowboy is sitting on Grandpa’s lap in heaven. Those two had a unique bond.


After much sadness and the realization of how quiet are house was without Cowboy Cat 2000, Biceps coerced me into getting two new kitties from the rescue center. Their names are Maxwell and Bianca. You will be hearing lots from them, I assure you.


There is so much more to catch you up on-like this visit to a blue whale, but we don’t need to shove it all into one post, do we? I am so thankful to be blogging again, to visit with all of you and to catch up on your lives as well. Welcome back to Potholes and Pantyhose!

Read more