Owning rental properties along with my own home, I have learned what works and what doesn’t in the painting department. Today, I want to share a few tips with you on how to paint like a pro.
I will warn you, once you learn how to paint properly, you will begin to notice shoddy painting and want to talk about it with husbands and friends….which usually aren’t that interested in the subject. Unless they’re freaks like me.
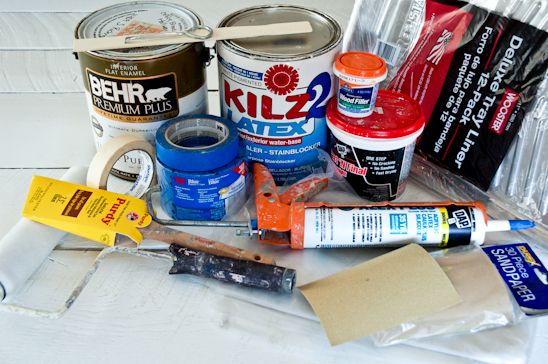
Here’s all that you’ll need in order to paint like a pro:
Lightweight Spackling
Wood Fill
Fine Sand Paper
Primer
Paint (can opener, stir stick)
Painter’s 2″ Blue Tape
Masking Tape
Plastic Drop Cloth
Brilliant White Acrylic Latex Painter’s Caulk-no Silicone and Caulk Gun (I recommend buying one with a tension release lever)
Roller, Roller Cage, Roller Pan & Plastic Liner
2.5-3″ Paintbrush-I recommend Purdy brand because they don’t fall apart or leave bristles in the paint
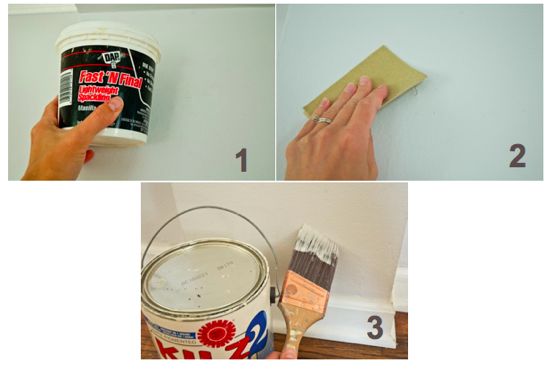
First things first. Lay out the plastic dropcloth and use the masking tape to tape seams together.
1. Fill nail holes and low spots on the wall using your finger to spread lightweight spackling into the hole.
2. Let the spackling bubble over the surface of the wall a centimeter or two. Once dry, lightly sand the spackling by hand with the sandpaper.
3. Brush a thin coat of primer on all the spackled spots. Let dry.
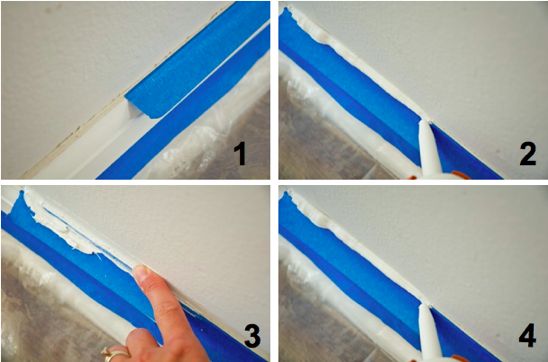
Next, use the blue painter’s tape to help create a perfect line between the trim and the wall color.
1. Apply the blue painter’s tape onto the trim leaving a 1/16 to 1/8″ gap between the trim and the wall.
2 (& 4). Using a box knife, cut a slanted tip on the end of the caulk tube. Insert the tube into the caulk gun and begin squeezing out a line of caulk along the edge of the blue tape. Do this process in 6′ increments to avoid letting the caulk dry out.
3. With each 6′ increment, use the index finger to run along the line of caulk, removing excess caulk. The goal is to create a seal between the wall color and the trim (that the blue painter’s tape is protecting). You don’t need a huge line of caulk, just enough that the blue tape shows through the caulk and a seal is formed. Have a wet rag handy to wipe your fingers on. It’s going to get messy.
4. Continue this process until all windows, doors, crown moulding and floor trim are taped off and caulked.
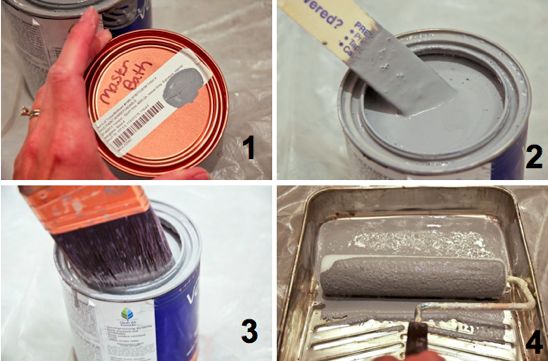
Once the caulk is dry, it’s time to load your brushes and rollers in preparation to paint. I know this isn’t the paint that I have picked out for my living room, but it does the job!
1. Label the can of paint before you start with a permanent marker. (This will save future headaches of not knowing which paint goes to which room-Lowe’s also offers the option to keep track of your paint colors online.) Slowly open the can using a paint key (given to you free at the paint counter) by going around the entire rim of the lid. Lift the lid straight up to avoid drips.
2. Use a stir stick to mix up the paint (even if it’s already been mixed in the store). The pigment will settle at the bottom. Pull up from the bottom with the stir stick and then stir in a circular fashion one or two times. Repeat this process until the paint is thoroughly mixed.
3. Properly load a paint brush by dipping into the paint about 1/4″ and scraping the brush against both sides on the paint can.
4. Properly load a roller by pouring paint into the paint tray (with liner), using a paint brush to catch drips from the can. Begin by lightly dipping one side of the roller into the paint and dragging the roller back towards you in the pan. Do this several times until the roller is fully loaded all the way around.
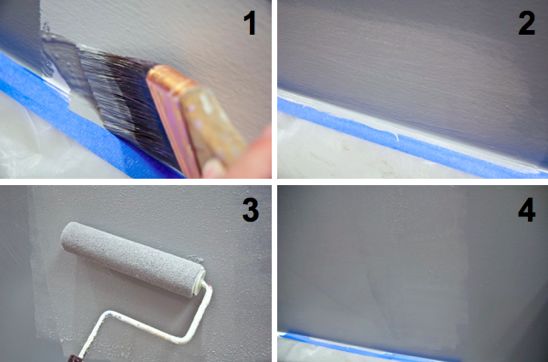
Now that we have our walls prepped, the floor protected and the trim ready to receive paint, it’s time to slap on the color!
1. First, you “cut in” the trim before rolling the walls. With your loaded paintbrush, give the brush a slight angle as you “cut in” along the trim. The “cutting in” should be one motion, pulling the paint from left to right (if you are right handed). You shouldn’t be brushing back and forth-this will create thick spots and lines in the paint.
2. Some of the paint will be seen on the blue tape-this is exactly why we have the tape and caulk protecting the trim.
3. Next, roll the walls with a loaded roller. Use a “W” pattern as you roll in the walls. This will help avoid lines being formed in the paint.
4. Once the first coat is dry, apply a second coat if need be. Also, scan the walls for “holidays” which are formed by air bubbles in the paint finally popping and leaving behind tiny see-through spots. Touch up where it is necessary.
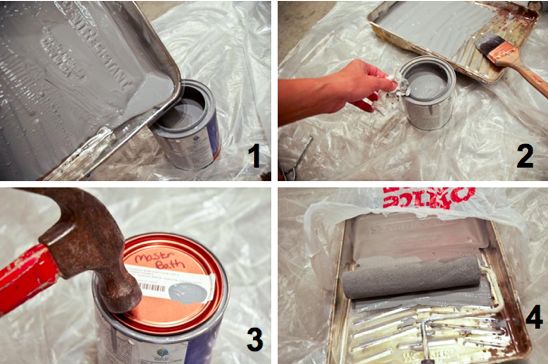
Until I am 100% certain that there will be no further touch up, I bag up my brushes and my rollers.
1. Pour all excess paint back into the can, using the brush to make sure you have removed as much as you can from the paint tray liner.
2. Wipe the rim of the paint can so that it can be sealed properly.
3. Tap the lid on with a hammer, going around the entire rim.
4. Bag up the liner, the roller and the brush with plastic bags, sealing them off as much as you can from outside air. This will keep the paint wet in case you missed a spot.
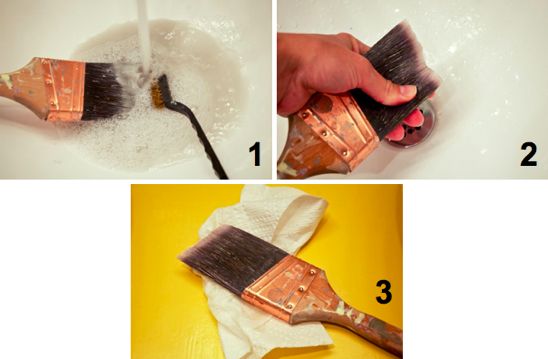
If you are certain that there will be no further touch up, it’s time to clean the brush and roller.
1. Use lukewarm water and a mild soap to clean the brush. If there is stubborn stuck on paint, use a wire brush pulling lightly from the handle towards the edge of the brush.
2. Squeeze the excess water out of the brush or roller.
3. Lay flat to dry (either outside or on a paper towel to protect the surface it’s laying on-there often is excess paint that dribbles out over time).
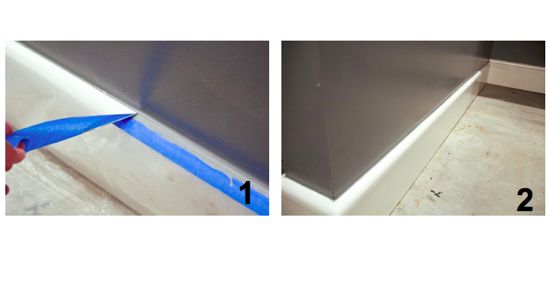
Now, the reveal!
1. Once the paint is dry, it’s time to pull the blue painter’s tape from the trim. Do not wait more than a few days to pull the painter’s tape from the trim. Grab one end of the tape and pull towards you with a 27 degree angle (in between a 0 degree and a 45 degree angle). Pull slowly, allowing the caulk to tear it.
2. If the caulk was applied too thick, it may begin to pull the paint from the wall along with it. If you notice this starting to happen, use a box knife to help create a clean line. If the caulk was applied properly, you will have a beautiful clean line between your wall color and your trim.

Now that the brushes are clean, the tape has been pulled and everything has been put away, stand back and enjoy the brand new color on your walls. And the fact that you just painted like a pro.
PS-Here’s the full Master Bathroom Remodel-Part Uno and Part Deux for your ocular senses!


