Archive for category: Arts & Crap

Vintage Apron Skirt for the Sassy Girl

When life (Grandma) gave me aprons-lots of aprons…
I decided to make a skirt!
And I also believe that my stack of aprons are pro-creating with my original four. I keep finding more. Creepy.
I decided something must be done.
And this skirt popped in my crazy brain while I was sawing today.
This is super easy to make! And because it is a one of a kind, you will never be bummed at another church picnic because you are wearing the same exact thing Sister Susie is wearing.
Oh, isn’t that just the worst?


Here’s what you’ll need:
Iron & & Ironing Board
Scissors
Tape Measure
Seam Ripper
Straight Pins (although mine are a bit curvy)
Thread to match
Three aprons of similar length
Button Covers (if desired), or buttons-cute ones, please!


I chose these three adorable aprons because of the different patterns-gingham, stripes and floral print.
And they were pretty much the same length, too.
I decided that stripey would be my front of the skirt (the apron on the right), floral would go underneath the front as an accent (the apron on the left) and gingham (center apron) would be the back of the skirt.


Using a seam ripper, remove any pockets on the aprons that will be on the back of your skirt or is the accent pattern on your skirt.
Try not to poke your finger. Ouch.


Next, cut the apron strings (tee hee) from the aprons that will be the back of the skirt and the accent pattern. Keep these little suckers for later.


Make sure your apron is good and wrinkly.
Next, measure the center of the apron that will be the front of your skirt. Cut from the bottom of your apron towards the top, stopping at where the waist band is.


After you have made your cut, flip your front over and iron a seam allowance of about 1/4”.


Pin the apron strings that you had cut off of your accent pattern apron to the front of your skirt. Fold a 1/4” under for your seam and iron the strings into place.
Sew your strings to the front of your skirt.


Place the front of your skirt right side down. Center and pin to it, with the right side down, the accent pattern apron. Sew into place.


This is how the front of your skirt should look by now. See the peekaboo accent pattern? Isn’t it precious?
Moving on.


On the right side of the skirt, pin the front of your skirt to the back of your skirt, using a 2” seam allowance. Place a pin 4” below the waistband.
Sew into place, stopping at the 4” pin. Slip on your almost done skirt and pin the left side into place, top to bottom.


Sew from the bottom to the top on the left side of your skirt.


I made my own buttons using the material leftover from the apron strings. But you can use any ol button your heart desires. I made one real button hole on the right side and attached a matching button on the left side of the skirt, just to bring symmetry to the situation.
I also added a hook and eye on my right side, for more concealing power. But you can use a second button, or forgo the whole button thing and throw in a zipper.
Get crazy! I dare ya!


And here’s the finished front of the skirt, once more. Isn’t it cute, sassy and vintage all rolled into one? I think so, and I think I will wear it tomorrow night.
And below is my backside.


My very wrinkly backside. Please ignore the fact that I did not iron this apron. I wanted cheddar whales, hubby and a little snuggle time.

Let me know if you make an Apron Skirt. I would love to see it!

Read more

Can You? I can, I CAN!

This isn’t a new idea-this is just my take on it.
I wanted a little panache on the back porch for the summer season.
This super easy to make lantern casts a warm glow; without being too frilly. I mean, I am married to a man. A man with an opinion. And his opinion is usually ‘sans frills’.

The best part, I was able to make these lanterns for next to nothing.
And I mean nothing. The cans were given to me by Grandma during the mass divesture of her life’s collections, the lights were $1 clearance item from ‘Tar-zhay’ years ago and my elbow grease costs me nothing other than yet another round of the Arnica gel.


What you’ll need:
Power Drill with different sizes of drill bits (I used 1/8”, 7/32”, & 1/2”)
Light Socket with Cord (I found mine at Target, but I also found these online at Ikea for $3.99)
Sharpee
Large Tin Can
Clamp (not pictured)
Metal snips (also not pictured-I am bad, I know.)


Start off by making a pattern using a sharpee and a little whimsy.
I placed my sharpee dots about 1” apart to accomodate the 7/32” drill bit I used. (The hole from this bit is about the size of a hole punch.)
Cover your work area with paper-the little metal bits are a bugger to clean up, trust me.
Securely fasten your can to a solid surface using your clamp.
Now, drill out all the whimsical sharpee dots.


Use a large drill bit to make a large hole at the top of your can for your light socket to come through. I used a 1/2” drill bit for this, drilling two holes side by side.


Make sure that the cord fits through the hole that you drilled in the top of the can.
If it doesn’t, don’t panic. Just drill another hole, or cut a little here and there with metal snips until the cord does fit.


Here are my Holy cans. You can see where my drill slipped and left a trail and where I didn’t quite ‘hit the mark’. But, I’m ok with it.


These peaceful lanterns are sweet, but not frilly, mind you.
Not frilly in the least.
Ok, maybe a little, but don’t tell the hubby.

Read more

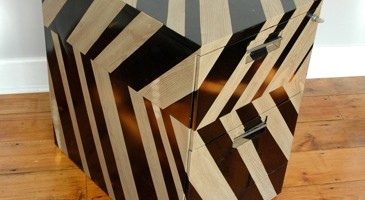
Mod Filing Cabinet

I was tired of the clunky metal object mocking me from the rest of my very ‘cool’ office.

I was inspired by something similar in a Ready Made magazine (now defunct) and just had to try it on my own, of course putting my own little spin on it.


What you will need:
Filing Cabinet-I picked mine up from craigslist for $15
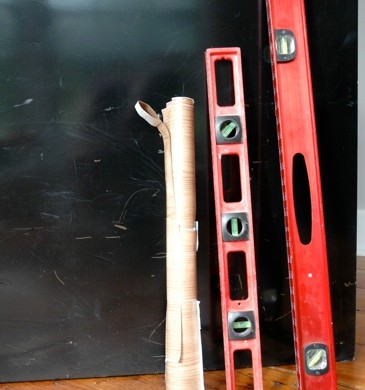
Contact Paper-I chose a wood grain birch (found at Lowe’s)
2’ or 4’ level
Exacto Knife/Scissors
Pencil


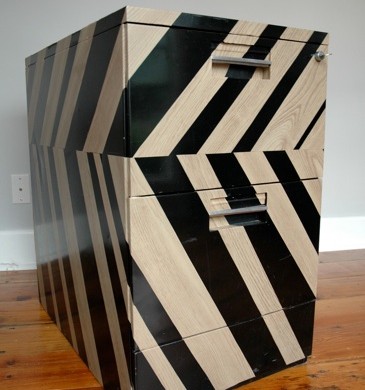
Using your level, draw a straight line across the middle of your filing cabinet. This will be the end point for your contact paper. I chose to put the line about a third of the way down of the filing cabinet, instead of a predictable half-way mark, just to make things interesting. I don’t like to be predictable…


Using your level, draw lines at 3”, 2” and 1” of thickness onto the contact paper to make the stripes. The angle you choose to have your contact paper at on the filing cabinet and the depth of your cabinet will dictate how long your strips need to be. Cut your differing width of stripes from the contact paper, overcompensating for the length.


I temporarily taped all of my stripes to the side of the filing cabinet, and adjusted them until I liked the look of them, before permanently adhering them to the cabinet. I have learned to do this the hard way. Let’s just say it is very difficult to remove contact paper from anything. Next, I drew little ‘tick’ marks onto the filing cabinet, notating where each stripe went, so I would remember in what order to adhere them to the cabinet.


Using a level, draw a line across the bottom of your taped contact paper stripes that coincides with the line you had originally drawn on the actual filing cabinet. This will make the bottom angle on your stripes. Remove your stripes and cut the tips off with your exacto knife or a pair of scissors.


Peel off the backing from your strips and began to place the stripes onto the filing cabinet, following your earlier notations. Smooth out the bubbles as you go.


Use your exacto knife to cut the top of your stripe off, leaving about an 1/8” to wrap around to the other side.


Repeat this process around the entire filing cabinet. If you have recessed pulls like I did, cut your stripes extra long in order to tuck the contact paper up and around your pulls. When placing the stripes on the drawers, cut them extra long in order to wrap around the edges of each drawer.


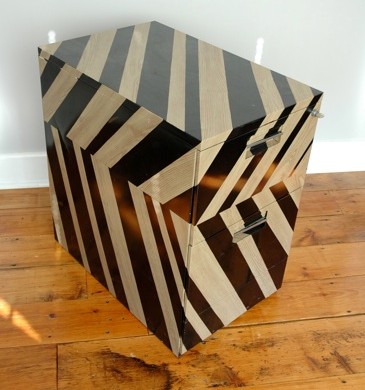
Now you have a ‘very cool’ filing cabinet! No more mocking us, Mr. Clunky Filing Cabinet!

Read more

Mod Log Table

I have been dreaming of an outdoor end table for quite some time. When my neighbor decided to chop down his very dead pine tree, the opportunity afforded itself.
I love neighbors with chainsaws.
Here’s a view of the finished Mod Log Table. Yes, it’s inside my house. No, it hasn’t spent a day outside yet. I think it’s kind’ve pretty inside…


In order to make your own Mod Log Table, you’ll need a dead tree-preferably very dead. I hopped the fence into my neighbors yard and picked out my victim from amongst the carnage laying before me.


I let my Little Mini chainsaw rest while I borrowed the neighbor’s beefier chainsaw. I tried to make the cut as even as possible, knowing I would have to sand down any high points on the wood later on.


I had some vintage legs laying around, but you can use pre-made legs that you can buy at Lowe’s. You’ll also want lag screws to fasten your legs to the log, polyurethane, a foamy brush, and gloves. You’ll want some steel wool & a microfiber cloth for in between your poly layers.


You’ll need a drill with a drill bit slightly smaller than your lag screw and a belt sander with 40 & 80 grit sandpaper, a socket set and a level(not pictured-sorry!).


Sand the top and bottom of your log until it’s smooth, starting with the 40 grit. Use the 80 grit for your fine sand.
That’s fine, baby, that’s fine….


Once your log is smooth, use small set screws to temporarily attach the legs to the underside of the log. Outline the table legs (so when you remove them later on, you’ll know where they go) and flip your table over to check for it being level.


Using your level as shown, ‘shim’ up your table leg until the table sits level. Measure the amount you will either need to router out of the underside of your table, or shim up with scrap plywood.
Or you can choose to sand it even more until your shoulder falls off.
Flip your table back over and remove the legs.


I cut out pieces of plywood with a jigsaw to make up the difference I had measured earlier in order for the table to be level. I chose to shim up my legs, mainly because I do not own a router. This doesn’t look quite as finished, but for an outside table, I was ok with it.


Drill pilot holes for your lag screws or for your pre-made table legs using a drill bit that is slightly smaller than the screw you’ll be using.


Use a socket set to insert your lag screws, if you have legs like mine (tee hee). If you have pre-made legs with the screw already sticking out of the end, just screw them into where you drilled your pilot holes.


Wipe the table down with a microfiber cloth-get all the nooks and crannies. Now it’s time to make it pretty! Enough of the functional stuff. WOO-HOO!


Apply your first layer of polyurethane and let dry according to the manufacturer’s instructions. It’ll be so purty when you’re done with the first layer!


Use your steel wool to get any of the bubbles out by ‘sanding’ it lightly.


Use your steel wool to get any of the bubbles out by ‘sanding’ it lightly.
Wipe the entire thing down again with your microfiber cloth. Apply another coat of poly and let dry.


You now have such a cute table, you may not be able to bring yourself to put it outside. Mine hasn’t made it outside yet. I keep telling myself to let go…but I’m worried it will be lonely outside…

Read more