Archive for category: Arts & Crap

Homemade Paper & Stationary Sets

I love writing thank you notes-real notes in my handwriting using a pen and a piece of paper.
Not an email, a texts or a tweets. A note that comes in an envelope with a stamp on it.

There’s only one thing better than a handwritten thank you note.

A handmade and handwritten thank you note.

This process takes less than an hour to do, plus dry time, and provides an impressive finished product. Let’s get started on making some fancy stationary, shall we?


Here’s what you’ll need to make your very own stationary:

A picture frame (I made mine from scrap lumber)
Blender
Sponge
Window Screen as large as the frame
Recycled paper, construction paper, newspaper, etc
Dried Flowers (If desired)
Paper Towels and Hand towels
Envelopes
Staple Gun
Utility Knife
A plastic bin larger than the frame (I used my sink, instead)


Begin by stapling the screen to the backside of your picture frame. Make sure the screen is securely attached. Over-do it, I give you permission.


Tear the paper into pieces about 2″ or smaller. Fill your blender with the paper, but don’t compress the paper. Add water until the blender is about 2/3 full.

Press the ‘pulse’ button several times to get the mixture going. Then, switch to ‘puree’, until the mixture has almost a smoothie consistency. I did this process several times to create enough of the mixture for the amount of paper I wanted to make.


Fill your plastic bin or in my case, my sink, with the mixture, adding water until it is about 4″ deep. I added enough water to my sink until the consistency resembled more of a soup like texture.


Dip your frame into the mixture, with the top of the frame facing up. Pull the frame out of the water slowly, allowing it to drain. You can even rest the frame on your bin to allow it to drain longer.

Add your dried flowers to the topside of the paper at this point.

Lay out hand towels and place several paper towels on top of them.


Flip your frame over on top of the paper towels. Allow the paper to release itself from the screen slowly. Use a sponge to gently remove as much excess water that you can from the paper. Allow the paper to dry for several hours.


Once the paper is dry, tear it by hand to fit the size of envelopes that you have. Save any scraps to be used as name tags for the final product.


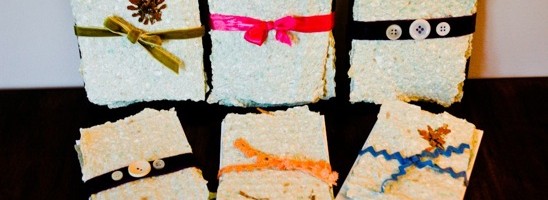
I made a stationary ‘set’ out of four pieces of the homemade paper with four envelopes. I then decorated the sets with scrap ribbon and ric-rac that I had on hand, adding buttons on a couple for a little extra ‘wow’ factor.

I used the scrap pieces of my homemade paper as name tags to accompany the sets.

My homemade stationary sets were a big hit with the family-or so they told me. I choose to believe them.

 

Read more

Snazzy Zipper Necklace

I delight in making Christmas gifts for family and friends.
Of course, there’s the stress out part when I’ve hot glued my knuckle for the tenth time and the present still isn’t finished. But, when the stars align and my present comes off without a hitch with no skin burned in the process-that’s when I can say, ‘Merry Christmas’!

It was difficult to wrap up this Fancy Zipper Necklace and place it underneath the tree.
But since it was so easy to do, I might just have to make one for myself.


Here’s what you’ll need to make this simple necklace:
Metal zippers-3-4 colors
Iron & Ironing board
24” ribbon
Hot glue gun
Scissors
Invisible Thread and needle (not pictured, because it’s invisible…)


Cut the stops from the ends of your zipper and remove the slider.


Iron the tape (fabric) on your zipper flat. Don’t iron the teeth-it scratches your iron and makes an awful sound. Not that I would know.


Make a loop around your pointer finger and place a 1-2” bead of hot glue on the end of the zipper tape (fabric). Begin rolling the tape in a circle, adding hot glue with each new loop.
Also, don’t lotion your hands for several days and then take close-up shots of them.


Your loop should look like this when finished-the teeth stair-stepping down as the loop grows.


Do this with each new color of zipper and choose how the zippers will be arranged on the necklace. I chose to make different sized zipper circles to add ‘visual variety’.
I just made ‘visual variety’ up. You have my permission to use it.


Add a bead of hot glue to attach one circle to the next.


Continue glueing until each circle is sufficiently attached to the next.


Here’s an optional step. My necklace recipient is a mother of many children, and I knew the necklace would be yanked on and possibly disrespected. Tsk, tsk. I sewed each circle to the next one using the invisible thread, just for added strength and kid-proofing.


After I had sufficiently reinforced the necklace, I chose the location where the ribbon would connect.


After cutting the ribbon in half, I used the invisible thread to attach it to the underside of my chosen zipper circles.


I implore you to try it on to make sure it looks cute.


My Snazzy Zipper Necklace did not disappoint me one bit. I hope the recipient likes it just as much. And if not, I may hint that I will take it off her hands. Heh heh.

Read more

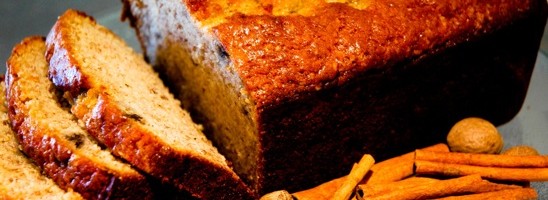
Beautiful Banana Bread

I love this recipe-it’s taken me years to get it just right and it’s so dang easy. I have inadvertently discovered a secret to making your banana bread super moist-causing demand from neighbor’s and Grandmother’s everywhere.

Yum. Grab your wooden spoon and apron.
It’s time to bake.


Here’s what you’ll need:

5 1/2 Bananas
1/2 Cup Sweet Cream Stick Butter (I use unsalted butter)
2 Beaten Eggs
2 Cups Bread Flour (you can use all purpose, too)
1 Cup + 2 Tbs Organic Sugar (I prefer this, because it browns nicely)
1 1/2 tsp Baking Powder
1/2 tsp Baking Soda
1/4 tsp Salt (or omit if using salted butter)
1/4 tsp ground Cinnamon*
1/8 tsp ground Nutmeg*


*Grinding your own cinnamon and nutmeg really sends this banana bread over the top. But, if you don’t have them on hand-don’t worry your pretty little head about it. Just use the store bought spice and no one will be the wiser.


Preheat your oven to 350 first and foremost.
Next, peel your naners and mash the puddin’ out of them with a potato masher.


Melt the 1/2 Cup of butter in the microwave. Add the two eggs to your melted and beat thoroughly with a fork.


Pour the butter and eggs into your banana bowl. Mix thoroughly with a wooden spoon.


In a separate bowl, add the 2 Cups of flour.


And the 1 Cup + 2 Tbs of sugar.


Next, add the 1 1/2 tsp of Baking Powder and the 1/2 tsp Baking Soda.


If you are using salted butter, do not add the salt. If you are a purist like me and buy unsalted butter, add 1/4 tsp salt.


If you are using fresh nutmeg and cinnamon-it’s time to get your ‘grate on’. Add either the fresh 1/8 tsp of Nutmeg and the 1/4 tsp cinnamon or the store bought kind to the dry ingredients.
Stir the dry ingredients with a fork thoroughly and then make a well in the center.


Add the banana mixture to the dry ingredients all at once.


Stir with a wooden spoon just until the batter is moist. There will be lumps-and that’s ok. Sometimes, life gives you lumps…


Grease the sides and bottom of a 9” x 5” loaf pan. If you use another sizes of loaf pan, just decrease the amount of time the bread is in the oven. Fill the pan 2/3 full.
Bake for 45-55 minutes or until a toothpick comes out clean.


Cool in pan for ten minutes on a wire rack or trivet. Run a knife along the sides of the pan to release the bread. Flip the pan over onto a wire rack, tapping the bottom of the pan to remove the bread.


Make one for Poppa Bear, Momma Bear and Baby Bear.
Cool on a wire rack for ten more minutes. Now, here comes the secret part. Thoroughly wrap the bread in saran wrap-while it is still warm and let it sit overnight. You can go a step further and place the bread inside of a ziplock bag. This traps the moisture in the bread and makes it sooooo moist.


If you absolutely cannot wait until the next day to eat it-which usually happens around here if Biceps has anything to say about it-at least let it sit for an hour or two inside of the saran wrap.


Trust me, it’s worth the wait.

Read more

Magical Mantel Decor

Truthfully, my ‘Magical Mantel Decor’ isn’t really magical.
It can’t grant you three wishes.
It cannot get rid of that zit before the big holiday party.
It can’t make you lose ten pounds.
But, it is pretty and shiny and oh, so very easy to do.

And that, to me, is a recipe for ‘Magic’. Plus, this decor is inexpensive. Therefore, Biceps thinks our Mantel Decor is magic to our budget.


All that you need for your own Magical Mantel Decor is:
Metallic Spray Paint and a drop cloth/plastic sheet
Desired Christmas Ornaments
Tinsel (not pictured)
Felled tree limbs-or go and cut them off of your living tree, while apologizing to it. That’s what I did.


Spray the tree limbs with the metallic spray paint. I recommend doing this out of doors, unless you like that fuzzy headed feeling. Let the limbs dry.


Place tinsel on the mantel before arranging the silvery tree limbs. Hang glittery Christmas bulbs from the limbs and intersperse them on the mantel itself.


And try not to drop any of them.


Stand back and take in the amazing thing you just created. Smile at your geniusness, laugh at your dusty pocketbook, scoff at stores selling ‘mantel decor’. You, my friend, have conquered your mantel.
Be proud-or humble. Whatever you think Baby Jesus would recommend.
(PS-I have had several peeps asking me about the MIRROR above my mantel. Here’s the link, if you would like to see a tutorial on how to make it for yourself!)

Read more