Archive for category: Lady Type Crafts

Blue Blazin’ Bag

I have an addiction named ‘coffee’.
I have a problem named ‘clumsiness’.
Eventually, my favorite beverage and my butterfingers collide, causing devastation to my beloved apparel. After many such occurrences, I salvage the usable material to give it a second life.

I made a lovely bag out of a coffee-stained corduroy blazer; using a moth-eaten sweater for the lining. There are several steps involved to making this, but overall it was pretty dang easy.
The two outside pockets hold my most important essentials-my cell phone in one, gum and chapstick in the other. The bag is big enough to fit my computer and my other what-not’s, as well.


Here’s what you’ll need to make your very own Blazin’ Bag:
A (coffee stained) blazer
A (moth eaten) sweater about the same width as your blazer
Thread to match
Seam ripper
Tape Measure
Straight Pins
Scissors
Iron & Ironing board
Sewing Machine with heavy duty needle


First, cut the sleeves and the collar from your blazer.


Next, cut open your sleeves.


Sew the opening of your blazer closed (down the front of the original blazer). Take a moment to sip a cup of coffee…but be careful. No spilling allowed.


Cut the top of the blazer off, right where the sleeves would have been sewn onto the rest of the jacket.


Measure the width of the bottom of the blazer. My blazer was 17” wide at the bottom. Measure the same amount from the cut opened sleeve, plus one more inch for seam allowance on either side. The sleeve will add additional inches to the length of your bag. You don’t have to add the sleeve if you feel the body of your bag is large enough, as is.


Turn both the sleeve and the blazer inside out. Pin one side of the sleeve to the front of the blazer and the other side of the sleeve to the back of the blazer. Sew the sleeve to the bottom of the blazer. Sew the ends of the sleeve closed and attach them to the side of your blazer.


This is what the bag looks like at this point, right side out, if you didn’t accidentally sew the bottom of your bag closed.


Cut the sleeves and any ribbing along the bottom of the sweater and then turn it inside out. Also, turn your blazer bag inside out. My sweater was about the same width as my blazer bag. If your sweater is much larger, sew a seam and remove any excess. The sweater will be the lining to your bag.


With wrong sides together, pin the sweater to the top of the blazer bag, and sew together the two about a 1/4” down from the top.


Turn your bag right side out and fold the blazer inside the bag one inch from the top-iron flat.


Sew a seam 1/4” down from the top of the bag around the entire opening of the bag.


Turn the bag inside out, and sew the bottom of your sweater closed, leaving a 4” wide opening. Pull the bag back through the 4″ opening. Fold the opening under and sew closed once the bag is right side out.


With the leftover parts from the blazer and the sweater, piece together two 2 1/2” wide strips that are 2’ long. Iron a 1/4” seam allowance on each side. These will be the straps to your bag.


Pin the sweater to the blazer, wrong sides together. Sew the two together from the right side.


Decide where you would like the straps to be on your bag. Fold under the unfinished ends of the straps and sew them to the inside of your bag, using the ‘x’ formation for added strength.


Now, take your blazer bag out on the town-show it a good time and fill it with paraphernalia from your local pumpkin farm.
Or not. Your choice.

Read more

Blooming Flower Headband

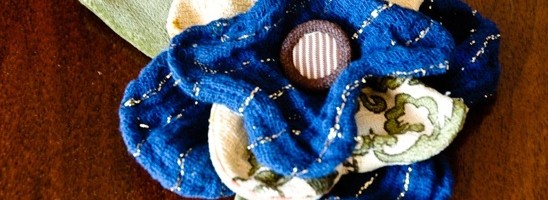
Using a few pieces of scrappy vintage material and green floral wire, I made a bendable flower hair piece that will bend to the shape of whatever my little heart desires. And, as an alternative I can wrap this around a pony tail or even around my neck as a choker.
So many options, so few opportunities to leave my house to show them off….


Here’s what you’ll need to make your own Blooming Flower Headband:
Two to three different colors of scrap fabric (I used a yellow and a blue)
Green fabric for leaves (if desired)
Thread to Match
A fun button
1/4” Ribbon or thin piece of hemmed fabric (30”+ long-this will be the tie that the flower is attached to)
Light duty floral wire
Wire cutters
Scissors
Straight Pins


Cut two identical circles from the material of your choice, each measuring: 4”, 6” and 8”.
I used the blue material for my 4” and 8” circles. I used the yellow material for my 6” circles (pretend the one in the center is yellow).


Sew the identical circles together, wrong sides together and leaving a small opening.


Turn each of your circles right side out, using the small opening.


For each circle, cut floral wire three inches larger than the diameter of the circle.


Feed the floral wire inside each of the circles, molding it to be on the outermost edge of the circle. Twist the ends together and cut off any excess.


Sew a seam to encase the floral wire about a 1/4” from the edge of the circle. Turn under the fabric on the small opening and seam close the circle.


You should have three bendable circles at this point. They’re so cute.


I bent my circles to have four ‘petals’, which looked the best to me. (But do what you think looks good-I know you will). I added a button to the center of my flower by sewing from the bottom up.


Cut out four sets of matching 2”-3” long ‘leaves’ if you like that ‘earthy look’. I know I do.


Sew each leaf together, right sides together, leaving an opening at the bottom of the leaf. Turn the leaf right side out and sew closed the opening.


Hand stitch the leaves where your little heart desires on the bottom of the ‘flower’.
I tacked down the top ‘petals’ to the bottom, just to keep the flower from shifting around.


Lastly, hand stitch the 1/4” ribbon or thin hemmed material to your flower.
I placed the flower on my head and determined where I wanted it to land on the ribbon. Then I hand stitched it in place on the ribbon.


Lastly, tie that sucker on your head, your pony tail or around your neck and strut about the neighborhood until someone tells you how cute your blooming flower headband is.
Or not…


You could just do what I did in this picture and wear it around the house with pajama bottoms and flip flops. Either way, you have a cute Blooming Flower Headband.
And all is right in the world.

Read more

Marbles and Copper Wind Chime

Nothing is more pleasant on a windy fall day than enjoying the melodies of wind chimes as you cuddle the one you love. However, most wind chimes are rather pricey and I can’t justify paying for noise-when I can make it myself.

With a little creativity and a few leftover bits, I invented my own rendition for under $5.
And it is music to my frugal ears.


Here’s what you’ll need to make your very own wind chime:
4’ + feet of copper tubing (found in the plumbing dept. in home improvement stores. I had a scrap laying around.)
Kitchen twine or any thin waxed rope
Drill with drill bit comparable to the size of rope you use
Thin, bendable wire (I used 20 Gauge, galvanized)
Wire cutters
Needle nose pliers
Marbles or a replacement striker (a small piece of solid wood, etc)
Paint Can Lid
Spray Paint of your desired color
Skill saw with metal cutting blade
‘S’ hook for hanging the wind chime


Evenly spray your paint can lid in your desired color. Let it dry and do some other stuff to keep busy.


I divided my 4’ of copper tubing into 5 segments; 4”, 6”, 8”, 10” and 12”.
Using the skill saw with a metal blade, cut the desired lengths from the copper tubing.


Here are my pretty little copper tube segments. They remind me of churches and pipe organ and fancy lacy socks…but I digress.


Measure 1” down from the top of each segment, marking it with a sharpie.


Using your drill with the bit the same size as your rope; drill all the way through your copper tubing.


Lightly sand any burs from the drilling and cutting process off of the copper. Be careful-copper scratches easily.


The circumference of my paint can lid was 15”.
I divided the circumference equally among the five segments of my copper tubing.
For example, my circumference was 15” and I had five segments. This means that I could equally space each tube three inches from each other.
I wanted the rope that held each piece of copper tubing to be attached to the paint can lid 2” apart. This left 1” to space between the next copper tubing. Are you confused yet? Sorry…
Next, drill a hole in the center of the paint can lid. That’ll give your tired brain a bit of a rest.


Thread only the smallest piece of copper tubing. Then thread this piece to the paint can lid, allowing it to hang about 3” from the lid.
Continue this pattern, using the next longest piece of copper tubing.


This is what the top of your paint can will look like once you have threaded each piece. I used electrical tape to tape down the ends of my kitchen twine.


This is the bottom view of how the copper tubing has been threaded together. By threading it this way, it prevents the tubes from being tangled up with one another in the case of high winds.
And if you live anywhere close to the Dust Bowl area, you know what I mean.


Encase your marbles (if you haven’t lost them, haha…) with your 20 gauge wire, leaving a loop on the top and on the bottom. I used a larger marble to be the striker and the smaller marble to hang on the very end of the striking rope to weigh it down.


Thread the larger marble through the paint can lid, leaving a 6” excess on the top side of the paint can lid in order to tie it onto the ‘S’ hook. Make sure that the larger marble will strike your copper tubing. Mine rests at about 5” down from the paint can lid. Tie the smaller marble to the larger marble. My smaller marble rests at about 17” from the paint can lid.


Tie the excess 6” of rope onto your ‘S’ hook and find a super duper spot and hang that sucker up.
Then, sit back and enjoy the melodious sounds of your brand new, frugally made but gorgeous wind chime while snuggling your favorite pal or cat or dog or stuffed dolphin…
Hey, I don’t judge. Well, maybe a little.

Read more

Recycled Sweater Mittens

I love wintery mittens and needed a pair to accompany the Sweater Scarf I had recently created.
Using the sweater scraps leftover from the scarf, I was able to make two adorable, matching mittens.

I lined my mittens with a darker sweater material, leaving the vibrant lime green material on the outside for prime cuteness.


Here’s the two pieces together in action. I can’t wait for the weather to turn colder so that I may sport these around town.


This is what you’ll need for you very own pair o’ mittens:
Two old sweaters
Scissors
Seam Ripper (for mistakes…which I typically make)
Straight pins
Tape measure
Thread and Bobbin to match
Sewing Machine


I am sure there is a more technical way to create mittens, but I had a pair of stripy mittens that fit my hands well.
Using the stripy mitten as a template, I lined it up on the body of the sweater. I wanted the ribbing of the bottom of the sweater to be the opening of my mitten (where it would hit my wrists).
With the fabric doubled and with right sides out, I pinned the stripy mitten to the sweater fabric.


I cut around the stripy mitten, leaving a 1/4” seam allowance, creating two pieces of material with the fabric right side out.


Using the recently cut out pieces from the lime green sweater, I pinned one to the wrong side of the lime green sweater, with the fabric doubled.
I cut out two more lime green pieces, creating four pieces altogether.
I then cut out two darker green sweater pieces, with right sides out, but allowing for a 1/4” seam allowance around the entirety of the mitten.
I turned the darker green sweater inside out and cut out two more mittens.


I now had eight total pieces; four darker green and four lime green.
When viewing the pieces going in the same direction, you should now have two of each color with right sides out and two with wrong sides out.


Sew together two matching pieces with the thumbs facing the same direction and with the material wrong side out. You should end up with four total mittens.
Turn the set right side out that will be the outside of your mittens.


Insert the inside of your mitten into the outside of your mitten.


Fold over and sew the extra 1/4” of the inside of your mitten onto the bottom of the outside of your mitten.


I harvested embellishments from the original sweater and hand sewed them to the front of my cutesy little gloves. Which then reminded me of a whale…which then made me take this photograph…which you are now forced to endure.


Here’s a look at the entire ensemble which has made me happier than a hot pig in a cold mud bath.
Weird analogy, I know. But that’s just me-weird.

Read more