Archive for category: Christmas Gift Ideas

DIY Family Board Game

Our families both appreciate hand-made gifts for Christmas-especially if the gifts are not of the socks or underwear variety.
So, when it came close to Christmas, Biceps and I decided to make a DIY Family Board Game for each side of our families.

The family loved it-who doesn’t like to hear questions asked about themselves?-and it has become a tradition to play our game together, adding new cards each year. I’ll show you around the game and then give you a step by step tutorial on how to do it yourself!


We personalized the entire game by creating question cards that pertain specifically to our family using old stories, funny memories and anything that might embarrass each one of us.


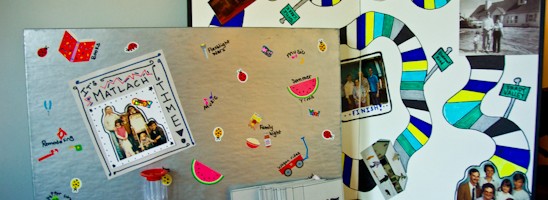
We harvested old family photos and glued them to the board, using street names from our hometown to guide the way around the board.


We also personalized game pieces that are meaningful to our family-my dad swears every year that the Christmas tree grows on the way home from the forest and he also can put away two ginormous bowls of popcorn in one sitting.


We then decorated the box with stickers and photos, recalling yesteryears of campfires, sleeping bag rides and such other childhood awesomeness.
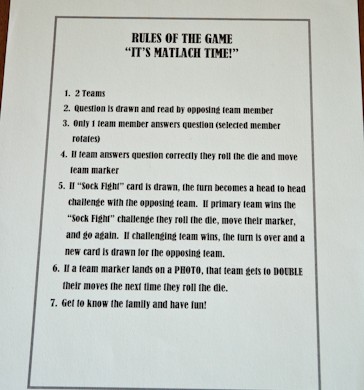
 

And of course, a very specific set of rules was implemented by the one and only rule giver-Biceps.
I don’t need no stinkin’ rules.
The rules are pretty simple-divide into two teams, one team draws a question card, but only one member of that team gets to answer the question. If they answer correctly, they roll the dice and move that many spaces. Then the next team goes.
BUT-if you land on a “Launchpad” (a photo along the path), you get to double your roll the next go around.
Pretty simple. Except Biceps threw in a bunch of more rules…he is such a rule monger…


It was a rather simple process to make the game and a bonus was the miniscule financial investment. Like $4.00 or so. The whole idea was a real win-win.
Now since you have witnessed all of this DIY Family Board Game-let me tell you how I made it!


Here’s what you’ll need to make your very own board game:
An old, neglected board game (I don’t understand Parcheesi, so it was sacrificed)
15-20 sheets of Card Stock (for the question cards, I used gray)
4-6 Sheets of Card Stock (to cover the board, I used a light tan)
Rubber Cement
Markers
Old Family Photos
Stickers (optional)

To play the game:
Game Pieces (I used a mini tree and popcorn box I already had on hand and hot glued it to a penny)
Dice
Timer (I bought mine at a educational supply store for $3)
Playdough (not pictured-it dried out because of inadequate lid tightening and I need to buy some new ‘dough. Deal with it.)


Rubber Cement the card stock to the game board. Pay heed to the folds in the board and cut your card stock accordingly.


Once the board is covered and the rubber cement is dry, cut out family photos to decorate the board with. These photos became our “launchpad”-meaning, if you landed on them you got some sort of bonus roll/move.


Glue your photos down, making a definitive “START” and “STOP”.


In between the “START” & “STOP”, create a meandering and colorful path around the board, spicing up the path with the occasional photo (Launchpad).


Now, paint, cover with a fabric or whatever decor you desire to the outside of the game’s box. Add additional stickers, sayings, or more photos that mean something to you and yours.


Here is an example of our rule sheet printed out on card stock. They are your typical multiple player board game rules with specifics thrown in for our family.
You may copy these rules for yourself, make up your own, or just make them up as you go along-that could get exciting.


Up until now, things have been smooth sailing for you. Now comes the slightly more difficult task of creating questions. We tried to make sure our questions had a specific answer, were known by most family members, and slightly obtuse.
For example, instead of: “What is Grandpa’s first name?”
Asking: “What was Grandpa called as a boy following a disturbing fishing incident?”

We also added another twist-kind’ve a “wild card” known as “Sock-Fight!” on my family’s side and “Breaker-Breaker!” on Bicep’s side. These “wild card’s” cause a head to head challenge with the other team. If you beat them at a skill; drawing, sculpting or charades, you get to go again. If you don’t beat them, you loose your turn.

We spent a long time collaborating on the questions, re-wording, re-writing, making a template on my computer and then printing them off onto the card stock. (Someone is a perfectionist-but I won’t name any names). I then skipped over to a copy center and used their cutting machines to make each card precisely the same size- 2 1/4 x 2 1/4.


And that, my dears, was our DIY Family Board Game. The family loves it because it’s about them. I love it because it’s become a family heirloom that is added to each year with a marriage, a birth, or just another embarrassing moment.
As far as homemade gifts, this one was a dead-ringer.
Read more

Vintage Christmas Gifts & My Etsy Store

Dear Readers:
I hate to self-promote. It seems so trite and ridiculous.
So, if you want to go over to my Etsy site and buy something, by all means, do it. But I don’t want to guilt you into it and beg of you to do it.
That said, I just added a bunch of new stuff today and am excited to share it with you. I thought you might be on the prowl for a great Christmas gift, or an idea of the vintagey finds out there in the world.
If so, here are a couple of sneak peaks at what you might find.

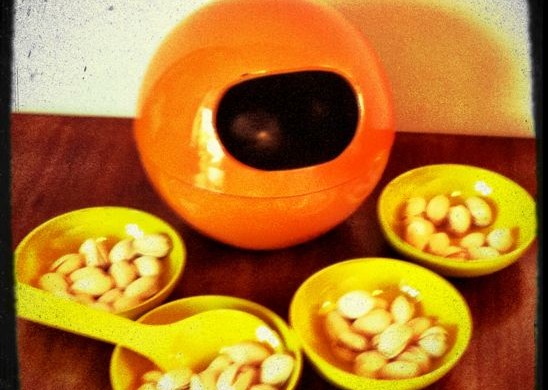
Super cute vintage burnt orange nut bowl ready for your next party-$25.00.

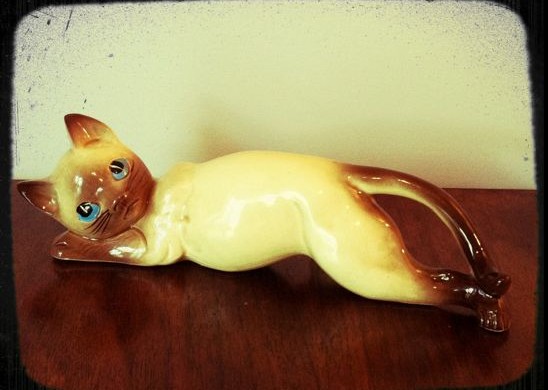
My shop wouldn’t be complete without a vintage cat or two-$15.

Vintage cow bottle opener with tongue and major sass-$22.50.

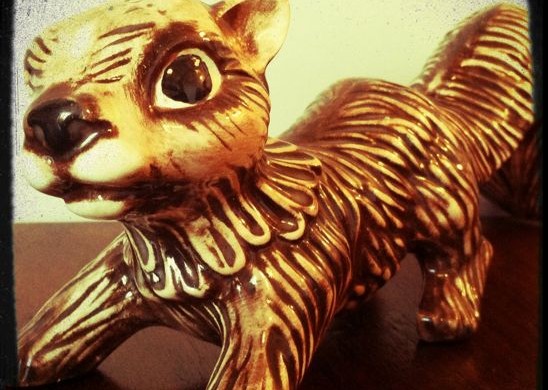
Cute vintage squirrel that won’t bite through your electrical cords like a real squirrel would-$25.

That’s just a couple of items that I have for sale in my Etsy store. It’s quite often a rotating amount of inventory, so if you don’t like what you see now-maybe I’ll hit the mark with you next time.
-Love, Rebekah

Read more

Homemade Paper & Stationary Sets

I love writing thank you notes-real notes in my handwriting using a pen and a piece of paper.
Not an email, a texts or a tweets. A note that comes in an envelope with a stamp on it.

There’s only one thing better than a handwritten thank you note.

A handmade and handwritten thank you note.

This process takes less than an hour to do, plus dry time, and provides an impressive finished product. Let’s get started on making some fancy stationary, shall we?


Here’s what you’ll need to make your very own stationary:

A picture frame (I made mine from scrap lumber)
Blender
Sponge
Window Screen as large as the frame
Recycled paper, construction paper, newspaper, etc
Dried Flowers (If desired)
Paper Towels and Hand towels
Envelopes
Staple Gun
Utility Knife
A plastic bin larger than the frame (I used my sink, instead)


Begin by stapling the screen to the backside of your picture frame. Make sure the screen is securely attached. Over-do it, I give you permission.


Tear the paper into pieces about 2″ or smaller. Fill your blender with the paper, but don’t compress the paper. Add water until the blender is about 2/3 full.

Press the ‘pulse’ button several times to get the mixture going. Then, switch to ‘puree’, until the mixture has almost a smoothie consistency. I did this process several times to create enough of the mixture for the amount of paper I wanted to make.


Fill your plastic bin or in my case, my sink, with the mixture, adding water until it is about 4″ deep. I added enough water to my sink until the consistency resembled more of a soup like texture.


Dip your frame into the mixture, with the top of the frame facing up. Pull the frame out of the water slowly, allowing it to drain. You can even rest the frame on your bin to allow it to drain longer.

Add your dried flowers to the topside of the paper at this point.

Lay out hand towels and place several paper towels on top of them.


Flip your frame over on top of the paper towels. Allow the paper to release itself from the screen slowly. Use a sponge to gently remove as much excess water that you can from the paper. Allow the paper to dry for several hours.


Once the paper is dry, tear it by hand to fit the size of envelopes that you have. Save any scraps to be used as name tags for the final product.


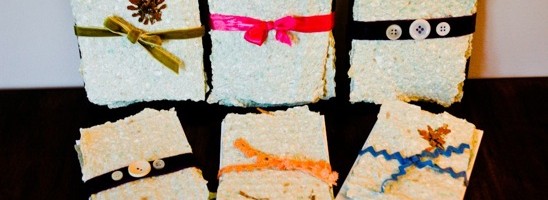
I made a stationary ‘set’ out of four pieces of the homemade paper with four envelopes. I then decorated the sets with scrap ribbon and ric-rac that I had on hand, adding buttons on a couple for a little extra ‘wow’ factor.

I used the scrap pieces of my homemade paper as name tags to accompany the sets.

My homemade stationary sets were a big hit with the family-or so they told me. I choose to believe them.


Read more

Snazzy Zipper Necklace

I delight in making Christmas gifts for family and friends.
Of course, there’s the stress out part when I’ve hot glued my knuckle for the tenth time and the present still isn’t finished. But, when the stars align and my present comes off without a hitch with no skin burned in the process-that’s when I can say, ‘Merry Christmas’!

It was difficult to wrap up this Fancy Zipper Necklace and place it underneath the tree.
But since it was so easy to do, I might just have to make one for myself.


Here’s what you’ll need to make this simple necklace:
Metal zippers-3-4 colors
Iron & Ironing board
24” ribbon
Hot glue gun
Scissors
Invisible Thread and needle (not pictured, because it’s invisible…)


Cut the stops from the ends of your zipper and remove the slider.


Iron the tape (fabric) on your zipper flat. Don’t iron the teeth-it scratches your iron and makes an awful sound. Not that I would know.


Make a loop around your pointer finger and place a 1-2” bead of hot glue on the end of the zipper tape (fabric). Begin rolling the tape in a circle, adding hot glue with each new loop.
Also, don’t lotion your hands for several days and then take close-up shots of them.


Your loop should look like this when finished-the teeth stair-stepping down as the loop grows.


Do this with each new color of zipper and choose how the zippers will be arranged on the necklace. I chose to make different sized zipper circles to add ‘visual variety’.
I just made ‘visual variety’ up. You have my permission to use it.


Add a bead of hot glue to attach one circle to the next.


Continue glueing until each circle is sufficiently attached to the next.


Here’s an optional step. My necklace recipient is a mother of many children, and I knew the necklace would be yanked on and possibly disrespected. Tsk, tsk. I sewed each circle to the next one using the invisible thread, just for added strength and kid-proofing.


After I had sufficiently reinforced the necklace, I chose the location where the ribbon would connect.


After cutting the ribbon in half, I used the invisible thread to attach it to the underside of my chosen zipper circles.


I implore you to try it on to make sure it looks cute.


My Snazzy Zipper Necklace did not disappoint me one bit. I hope the recipient likes it just as much. And if not, I may hint that I will take it off her hands. Heh heh.

Read more