Author Archive for:Rebekah

Sassy Military Up-Cycle Shirt

A few too many plain t-shirts are junking up my closet. When wearing a plain tee-I feel as if I am blending into the crowd. Today was the day to ‘Sassify’ one of my old boring t-shirts. I spent less than an hour of my day and used scraps of materials, turning this ‘yawner’ into a ‘take notice’.

This t-shirt is a nod to my Dad and the military blood that is running through my veins.
Having a father that is a Retired Lieutenant Colonel and a West Point Graduate influences much of my daily life-and now my clothing apparently…
I added little button details on the front and the back, just for a little more sass.


Here’s what you’ll need to ‘Sassify’ your own plain t-shirt:
Scraps of material (I would recommend using felt in a bold color)
Heat n Bond
Scissors
Tape measure
Seam Ripper
Iron & Ironing board


Using your scraps of material, pick out your style for your new shirt.
I decided on a simple stripe and used sparkly red felt (so that I wouldn’t have to seam the ends) on a deep purple shirt. But I say, ‘Get crazy!’ Make different colors of flowers, a bird, a cactus…whatever the heck comes to mind.


Apply your Heat n Bond according to the package directions. Iron that sucker in place and let cool.


After adding my stripe to the front of the shirt, I decided the tiny pocket needed a little something too. I added this geometric shape using the same Heat n Bond technique.


Lastly, I added a swatch that rests on the small of my back. I used Heat n Bond once again to attach it to the shirt. Next, I added buttons to give it that ‘military look’.


Here is a close up on the buttons that I added to the front of the shirt.
Snazzy and so easy.


Once more, here is the final product that set me back less than $1. And below is the back of the shirt.


I am so happy that this little ditty has a new life. It was headed for the garage sale pile, and now it’s my sassy go-to shirt when needed.
My Dad would be so proud.


Read more

The Henna Ritual

The night before the Indian Engagement Party, I was invited to photograph the bride-to-be’s side of the family during a traditional henna application ritual. They are a wonderfully spicy bunch of people that welcomed me with open arms.

Some of the ladies applied the henna to themselves; decorating both sides of their hands with intricate designs.


When they offered to decorate my hands, I was very tempted. But, how do you recommend I photograph with this stuff all over me?


The future bride was ‘tsk-ed’ by the elders when she moved around as her special ‘wedding’ henna was being applied by a cousin. Naughty, antsy girl.


The whole family stayed up until the wee hours of the morning talking over all the details of the engagement party happening the next day. Some got cranky….


Some passed out…
And me? Well, I got cranky and then I passed out. Finally, I went home at about 1 am and settled in for a long winter’s nap.


The next day, amidst the make-up application and the intricate outfit preparation, the bride-to-be was exquisitely beautiful and appeared calm. (see for yourself-An Indian Engagement).

However, I looked like death warmed over due to lack of sleep…but no one was looking at me. That was a blessed relief.

Read more

Easy and Hearty Chili-(Vegetarian or Meaty)

Mmmm….chili.
The perfect meal for any tummy on a cold winter’s day. I make a large batch and freeze a bunch for later use-or to share with others. Food is always better when shared.

And, the longer you let the flavors hang out and get to know one another, the better the chili is.


Here’s what you’ll need:

2 lbs ground turkey/beef (leave out if you’re going the vegetarian way)
2 Roma Tomatoes
2 White Onions
4 Cloves Garlic or 1 tsp garlic spice
1 Green Pepper
1 jalapeno or more if you like it spicy
2 Cups black beans, drained
(1)14.5 oz can chili-ready tomatoes, undrained
(1)15 oz can tomato sauce, undrained
(1)7 oz can green chilis, undrained
2 Tbs chili powder
1/2 tsp onion powder
1 tsp basil
1/4 tsp pepper
1/2 tsp salt

Cast Iron Skillet
Large Crock-Pot


Seed tomatoes, slice and place in a small saucepan with 3 TBS of water.


Stew over medium heat until soft and mushy. Set aside and let cool.


Seed and chop up the green pepper and the jalapeno. Slice up your onions.


Cook turkey/beef in your iron skillet and drain the fat. Return the meat to the pan and turn the heat to low. (If you are making the vegetarian version, skip this step.)


Mince your garlic cloves, adding it to the cooked meat (if you are making the vegetarian chili, mince the garlic into a large saucepan. Proceed to the next step).


Add the onions, green peppers and jalapeno to the meat. Cook on low heat until the tender, usually 3-5 minutes. While this is cooking, we’ll focus on our crock-potting next. Yes, ‘crock-potting’ is a word. Don’t try looking it up, though…


Turn the heat to low on the crockpot and add the “wet” ingredients:

Stewed Tomatoes
2 Cups black beans, drained
(1)14.5 oz can chili-ready tomatoes, undrained
(1)15 oz can tomato sauce, undrained
(1)7 oz can green chilis, undrained

Stir the ingredients together.


Next, add the spices to the crockpot:

2 Tbs chili powder
1/2 tsp onion powder
1 tsp basil
1/4 tsp pepper
1/2 tsp salt

Lastly, add the meat, onions, jalapeno and the green pepper. Stir thoroughly once more.


Add a little cheese on top and voila-yummy in your tummy.
I serve my chili typically with cornbread and raw veggies on the side. It’s so dang good, you may not want to share….

Put the ol lid on top, turn the heat to low and let simmer for 2-3 hours.

Read more

Retro Christmas Tree Skirt

I cherish Christmas.
It’s my absolute favorite time of the year. I anxiously await a reasonable time to launch into new crafty Christmas ideas, as soon as the first leaf begins to turn. This year I made it to the second week of October before I pulled out the decorations.
Ridiculous-I know. Fun-definitely.

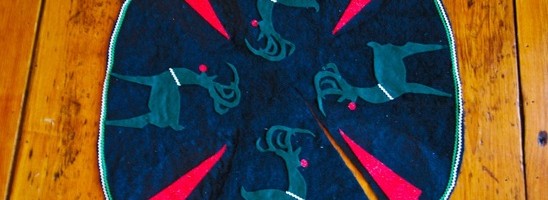
This tree skirt was made out of scraps of felt fabric, an hour of my time and a bit of vintage inspiration.


Here’s what you’ll need to make your own Retro Tree Skirt:
2 Christmasy colors of scrap felt (I had red & green on hand)
1 circle piece of felt-about 2’-3’ in diameter (I used black)
Hot glue gun or ‘Heat n Bond’
Scissors
Ric-rac
Card Stock with your desired image drawn & cut out


Pin the cut out images to the chosen Christmasy felt. Cut out 4-6 of each image, depending upon how they are distributed around the skirt.


I cut out four felt deer for my tree skirt. And named them (from left to right: Template Deer “Ed”, Prancer, Dancer, Blitzen & Rudoplh).


And, I cut out five sparkly felt Christmas trees for my tree skirt and named them, too (from left to right: Gerry, Edna, Harry, Bob & Alice). But, I ended up only using four of them, however.
‘Alice’ was very upset.


Cut out a 2’-3’ in diameter tree skirt base. Then, cut a slit from one corner of the circle to the center, so that it can wrap around the tree. Using either a hot glue gun or the ‘Heat n Bond’, distribute the images around the tree skirt however looks best.


I added red noses to the deer and a bit of ric-rac around their necks for that extra vintage feel.


I hot glued two different colors of ric-rac around the edge of the tree skirt for some Christmasy pizzazz


And Tah-Dah! A one-of-a-kind, vintage-inspired tree skirt.
The deer were happy, the trees were happy, my wallet was happy…Now, all I need is the tree.

Read more