Author Archive for:Rebekah

The Touring “Blues”

I have a disorder. It’s best if I just get this out in the open.
I group things together in colors. For example, the produce section is my personal heaven.
All the oranges in one bin, the green lettuce in another, the yellow lemons perfectly collected together.
And all is right in the world.

There’s no name for my disorder except ‘weirdness’. When I begin to edit my photos, I see them in groups of colors. And today all that I saw was blue.


Moody blue. The blue awnings on this building and the subtle blueish tint to the awakening sky set a quiet tone to the photo.


A creepy flier for ‘Wiley and the Checkmates’ performing at the local library originally captured my interest. But the hint of blue from an adjacent flier, tacked on the mustard colored wall sealed the deal today.


Need I say more?


Two colors of blue paint, blue books in the window, a blue flier on the door, blue chalk displaying their sales…Blue overload for this girl.


And yet somehow, I survive. In my blue shirt. With my blue eyes.

Read more

Rad Rubberband Guns and Mayhem

Biceps and I went the home-made route for our gifts this year. The ladies were easy. But the men? We toiled over what to make for those jokers. With ages ranging from one to a sixty something, it’s difficult to make a gift they could all enjoy. But the Lord offered His wisdom to us, bringing us an epiphany.
What do all men love, no matter their age?

Weaponry. And the bigger, the better.
With that epiphany came the conclusion that our ‘Man Gift’ would be a Rubberband Gun. It was cheap, it was easy and most of all-we were able to do it together-so it was fun.


Here’s what you’ll need to make a Mayhem Inducing Rubberband Gun:
Foam core (or a like material to be used as the gun stencil)
Plywood
Palm Sander and Medium Grit Sand Paper
Microfiber Cloth or lint free rag
Oops Paint/Stain
Skill Saw or a Jig Saw (not pictured)
Scroll Saw (depending on the intricacy of the design)
Clothes Pin
Rubberband
Tape Measure


You’ll also want:
5 Minute Epoxy
Brad Nails
Foamy Brushes

And, we added a few optional accessories that aren’t necessary, but are pretty stinkin’ cool:
For the strap:
Three feet of 1” canvas webbing (from the Army Surplus Store)
Two Drywall Screws and washers per gun to attach the strap

Name or initials:
Spray Paint
Stencils


Using the foam core, draw and cut out the stencil of the desired gun design. Trace the design onto the plywood. Cut the basic design out of the plywood using the jig saw or a skill saw.


If the design is intricate or has tight curves (heh heh), I recommend using a scroll saw for the finishing touches.


Once the design is cut from the plywood, sand the wood smooth with the palm sander.


Remove the dust with a lint free rag or a micro fiber cloth.


Apply the stain with the foamy brushes and let dry. I like to wear gloves, but you may like that dirty nail look that is virtually unremovable for weeks, even when you have an important meeting….


Once the stain is dry, cut in the paint with another foamy brush and let dry. Either paint or stain the clothespin during this process-depending on your preference.


If applicable, line up your guns while they are drying and revel in their glory. I know that’s what we did.


Disassemble the clothespin and apply 5 minute epoxy to the bottom side of the clothespin.


Glue the bottom side of the clothespin to the desired spot on the gun. We glued our clothespins 17” away from the release point. Brad nail the bottom side of the clothespin to the gun for added strength. Reassemble the clothespin once the epoxy is completely dry.


The next two steps-applying a name and adding a strap-are optional. We were making fourteen of these suckers, so we decided to put names on each gun in order to keep them straight within the family.
Tape the stencils to the gun using a quick release tape or blue painters tape. Mask off the rest of the gun to protect it from overspray. Spray the name with several light coats of spray paint.


The strap was made with a three foot piece of 1” canvas webbing. Use a washer to protect the screw from going completely through the strap.


Screw the strap into the desired spots on the gun.


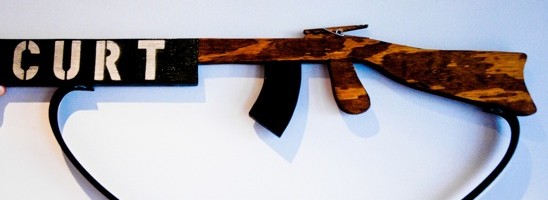
Here is one of our many finished products. So stinkin’ cool.


And here is the small arsenal of gifts once completed, taking over our home.


Biceps insisted he test out each of the guns.


I was caught in the line of ‘friendly fire’ several times.


He protested his innocence. And he’s so dang cute, he’ll get away with almost anything.


Each recipient fully tested their new weapon. At my house. For hours. With exuberance and glee. I suppose it’s my fault. I had a part in making them.
Merry Christmas, boys. Merry Christmas.

Read more

Sparkly, Silver, Vintage Christmas Decor

From the music to the decorating…our Christmas is pretty vintagy. Anything sparkly and old typically catches my eye. And anything cheap typically catches Biceps’ eye. This year, I pumped up the sparkly, adding vintage accents here and there.

We found our snazzy aluminum tree for dirt cheap years ago-and it came with blue and silver ornaments to boot.
Our living room has become a sparkly, shimmery wonderland. Rebekah likey.


We’ve collected vintage ornaments over the years-with a hard and fast rule of never paying more than a dollar for each one. I don’t know why we have this rule-probably because we are cheap.


This lucite tree was a gift from Grandma’s stash ‘o Christmas goodies last year. I Christmas-fy the tree with dainty green ornaments during the holidays. And yes, ‘Christmas-fy’ is a word.


This centerpiece on my dining room table spreads its cutesy flair during dinner.


I created this four foot silver twiggy tree for our breakfast nook. I just can’t seem to get enough of the twigs, lately.


Trust me, there’s more to share-but I don’t want to overwhelm you with too much sparkly.
I heard too much exposure to ‘sparkly’ can be bad for the brain…Check back soon to see what else I have up my sparkly sleeve.

Read more

Silver Twig Christmas Wreath

Due to my crazy house that sports two front doors, I needed two different wreaths for Christmas this year.
I wanted the wreaths to be complimentary, but not matchy-matchy. I don’t do ‘matchy-matchy’.
(Go here to see my other wreath: Whimsical Christmas Wreath)

I made my one-of-a-kind ‘Silver Twig Wreath’ in less than an hour. And that’s even with the time it took me to smash my thumb and say a PG word when trying to hang it up on my second front door.


Here’s what you’ll need to make your very own Silver Twig Wreath:
Metallic Silver Spray Paint
1’ to 2’ sections of Tree Limbs
Needle Nosed Pliers
Wire Snips
20 Gauge Galvanized Wire
Plastic or Paper drop cloth


For fun decor on the wreath: scavenge the house for sequins, tiny little birds, metallic circles, feathers, old ornaments, etc. I used a hot glue gun to apply the fun decor. (Hot glue gun not pictured due to my brain fart).


I cut my twigs into 1’ to 2’ sections, using my wire snips. I know this isn’t what wire snips are for, but…I am naughty that way. Using 3” sections of the galvanized wire, I joined my twiggy sections to one another.


Wrap the galvanized wire around the joined limbs, tucking the pointy ends underneath.


I continued this pattern until I had a nice wreath shape. I wasn’t worried about it being perfectly circular, and neither should you when you are making this. Perfection is highly overrated when it comes to crafting…


I sprayed my imperfect circular wreath with my spray paint of chose, as of late-Metallic Silver. It makes everything look very ‘ooh and ahh’…


Once the wreath was dry, I added birds and metallic circles here and there at my leisure. I even used the decor to cover over the wire. Pretty sneaky, eh?


In order to hang the wreath from the door, I simply tied a black ribbon onto what I deemed as the ‘top’ of it. I also added a vintage jingle bell to the center of the wreath-alerting me of intruders-or visitors…whatever you want to call them. You say ‘potato’, I say ‘puh-tah-toe’…


Simple, different, pretty and sparkly. The ‘Silver Twig Wreath’ is a fanciful addition to the second front door. And I like fanciful things very much, let me tell you.

Read more