This year was my first year for a full-fledged garden. I consider it full-fledged because it produced enough to not only feed Biceps and I, but it also allowed me to dehydrate, freeze and give-away the excess.
To be honest, I was just happy that anything sprouted from the earth.
I give props to the composted kitchen and yard waste that we added to the soil-this garden seemed to outperform many of my neighbors’ gardens.
And just in case you don’t want to go spend your hard earned dollars buying a fancy composter in excess of $100 bucks or more, I thought I would show you how to make your own using some recycled and some store bought materials for about $30 in a matter of hours.
(Here’s my video for my DIY Spinning Composter.)

Here’s what you’ll need for your very own composter (The store bought materials can all be found at Lowe’s):
Food Safe Barrel of some sort (I used a leftover crazy person’s 40ish gallon Y2K water barrel they had in their basement in preparation for the end of the world)
3″ ABS toilet flange (I used an Oatey brand for $3.60)
3″ PVC pipe (I bought a 10′ stick-that’s the smallest they had for $10)
3″ PVC cap ($.72)
(2) 2 x 6 x 10 pressure treated lumber (~10′ for $6.97) and pressure treated wood screws (about 20 or so)
(2) hinges with appropriate sized bolts and nuts-don’t use the screws in the package that comes with them (Gatehouse brand 3 1/2″ Butt/Mortise hinges for $2.78 each)
(1) window sash latch with appropriate sized bolts and nuts-don’t use the screws in the package that comes with them (Gatehouse brand for $3.59)
(1) galvanized pipe (I re-purposed a closet rod-1″ diameter and about 4′ length, but if you have to buy one, they are about $5-7)
(8) wood screws 1 1/2″ ish (I used leftovers found in my coffee can full of excess screw, but you may spend $.50)

Here are the tools you will need to complete the project:
Square
Skill Saw with wood blade
Drill with 5/16″ drill bit, hole saw slightly bigger than your galvanized pipe/closet rod
Fine grit sandpaper
Chop Saw
Old screen from window
Tins Snips to cut screen
Flat head & Phillips head screwdriver
Hammer
Let’s get started!

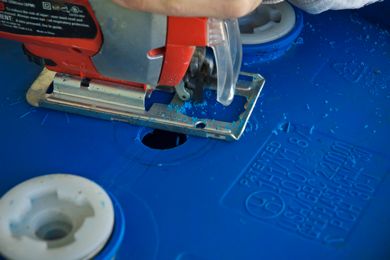
Determine which end is up for you and your barrel. On your “up” end, use your skill saw to cut out a lid in a semi-circle shape (half of the entire circle).

This is what the lid will look like when you are done cutting it out. Sand off any burrs.

Pre-drill the holes for the hinges and the latch. Sand off any burrs. Attach the hardware, using the bolts and nuts (bolts on the outside, nuts inside).

Attach the hole saw to your drill and measure halfway down on each side of your barrel, starting on either side of the lid. The holes should be drilled so that the closet rod will run parallel to the lid. Sand off any burrs.

Drill holes for your closet rod to go through. Insert the closet rod to make sure the barrel can be easily turned. If not, increase the diameter of the hole slightly.

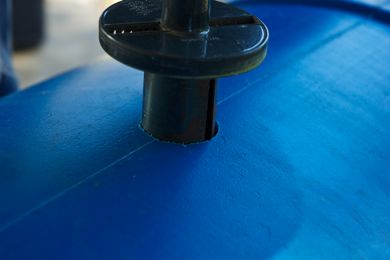
On the bottom of your barrel, trace the 3″ opening for the toilet flange using a sharpee in the center. Cut out the circle with your skill saw and wood blade. Sand off any burrs.

Insert the toilet flange to the outside of the barrel and make sure it fits snugly.

Cut out enough screen to cover the bottom of the opening in the flange. Pre-drill holes in order to screw the flange to the barrel and the screen to the flange.

Remove the closet rod from the barrel and place the PVC pipe vertically in the barrel, fitting it over the toilet flange. Cut the 3″ PVC pipe to fit vertically inside of your barrel, leaving about 6″ headspace between the top of the pipe and the opening of the composter. Place the 3″ cap on top of the pipe.
Mark where the curtain rod will meet with the PVC pipe.

Using your drill with the 5/16″ bit, drill holes several inches apart in the PVC pipe. Using the hole saw, drill two holes in the PVC pipe for the curtain rod to go through.

Using the same 5/16″ drill bit, drill holes vertically in the barrel, about 2″ apart vertically and 6″ apart horizontally.

Cut two identical “legs” for the composter using your chop saw and the pressure treated wood. Begin by measuring from the side of the barrel to center, adding 1 foot to the measurement. For each “leg”, measure 2″ down from one of the cut ends, center the hole saw to cut a circle for the curtain rod to go through.

Cut four identical lengths of wood (mine were about 2′ each in length) to secure the legs to. Attach with the pressure treated wood screws as you see here. I got fancy and cut the corners off of the base pieces. You don’t have to, it doesn’t affect the functionality of the composter.

I added spacers in between the pressure treated wood and the barrel to keep the curtain rod in place. They were just bits of pvc pipe that fit around the curtain rod, cut to about 2″ in length.

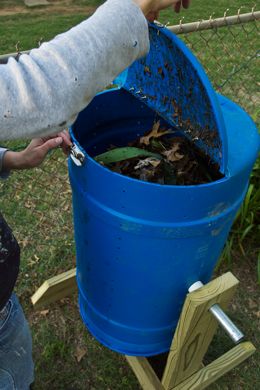
Give it a spin and see how much fun making your own compost will be.
Begin collecting all of your kitchen scraps: veggie/fruit peels and scraps, egg shells, coffee filters & grounds, etc (no meat, eggs or dairy) and throw it all in your barrel with dried leaves, grass and yard waste with a ratio of 1 (kitchen waste) to 2 (yard waste). Turn the barrel once a week and keep it as moist as a damp sponge by adding water when needed. (I save old coffee, rinse/rain water, etc. to moisten up the compost).

It’s ready to be used in the garden when the compost smells like heavenly dirt and is black and crumbly. Your plants will thank you so much for this yummy concoction…


