I happen to love flowers…and Mirror Art
And although this Arts and Crap isn’t about flowers, I must talk about them first. Because they are just so darn purty. Then, we’ll get onto mirrors.

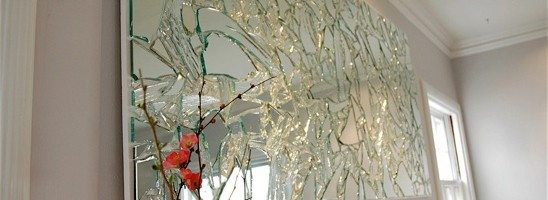
If you look deep into the photo, you will see a sneak peak of what we are going to talk about today. But don’t get stuck in the past for too long. Move on, people. Move on.

Although my fingers don’t care for the rough, thorny branches. My husband helped me band-aid one more finger before leaving the house on ‘an errand’.

A few minutes later, he came home with these.
Soft peach gladiolus. (Here’s another sneak peak at what we are going to make!)

And although I like the hard work of cutting branches from a deliberately mean bush and slicing open my hands, I am fond of the store bought kind too.

Even if they don’t put up much of a fight.
“Sissies!”-Mr. Thorny Flower.
Moving on…

Now that we have that discussion out of the way, see the background behind these flowers? That is what I wanted to talk to you about.

This is the finished product we will be doing together today. The entire piece is about 4 feet wide by 2 1/2 feet tall.

You will need broken or old mirror (pretend that I included the mirror in this picture), a hammer, heavy duty butcher paper or a heavy duty paper bag, gloves, a scrap piece of plywood, liquid nails and a caulk gun.We chose to paint our plywood glossy white. But you can do whatever you want. I know you will anyways…

Place the mirror in the paper bag or wrap it in the heavy duty butcher paper. Gently tap the mirror with the hammer a few times.

Open your bag to see what you’ve won. OOOH! You’ve won a broken mirror. How delightful!

Carefully retrieve the pieces of mirror and arrange them on your plywood in whatever pattern you desire.

You’ll want several sizes of the mirror chunks-so don’t get overly particular about uniformity.

After you have arranged the mirror pieces to your liking, start liquid nailing those suckers down. Make sure you have a system so that you don’t forget a piece. I recommend putting a small square of blue painter’s tape on each piece and removing it when the piece has been glued down. I did not do this, as you can see. Big mistake.

Let dry for 24 hours. Before hanging it, test that you did glue all of the pieces down by gently raising the board up and tilting it.
If a piece falls out, don’t worry. Just re-attach with more liquid nails.

We used drywall screws and screwed our piece of plywood straight to the wall. Then I touched up the screw heads with more glossy white paint. You can also attach the mirror to the wall by using two eye hooks and picture hanging wire.

Then stand back and enjoy your work of art. You are bound to get some ooh’s and aah’s from this little project.


[…] was hard to narrow my projects down, but here are three projects that I hope you’ll love! Broken Mirror Art. I love recycling discarded objects from our remodeling projects and then creating something […]
Um…I want one…BAD!!! Found you on HoH…so glad I did. I’m your newest follower. Would love it if you would stop by My World and check it out.
Jessica
http://myworldmadebyhand.blogspot.com
Hi coming your way from HoH! This mirror art, I am speechless! It looks incredible!
It’s so beautiful! I totally love it, and am pinning it for future use!
Also came over from HOH. This mirror is amazing! SO glamorous. Makes me wanna try it, myself!!! Great job.
I love this idea!!! So beautiful and recycled!!! I’m your newest follower and would love for you to visit and follow me, too!!!
Aimee @ ItsOverflowing.com
Oh I LOVE THIS!!! I absolutely must try it. I would love for you to link up to my Fresh Friday Link Party happening this coming Friday on my blog http://www.releasemecreations.com
P.S. How do you get the magnify option on your images? I LOVE THAT!
[…] Broken Mirror Art still gets a lot of action. Biceps and I created this mirror from sections we no longer needed […]
What an absolutely brilliant idea — as well as gorgeous. I can’t wait to make a lovely mirror like this. Thanks for the tutorial — I’m a happy new follower.
dawnedesign.net
Wow! This is stunning!!!! I would love to try this and have a mirror available!! Did you paint your plywood before gluing on the glass, or did you just leave it as is?? I’m very glad I discovered your blog… now following.
Would love you to pop by and visit sometime!
Kathryn@www.uglyducklingtransformations.wordpress.com
We painted the plywood a high gloss white before gluing on the mirror. But, you can paint it anything, or leave it au natural! Get crazy!
LOVE this project and I totally want to try it! Just became a follower!
Would love for you to come visit my blog @ toddlindsey.com
love it! Genius idea!
I HAVE AQUESTION, DID YOU USE DIFFERENT THICKNESSES OF THE MIRROR PIECES?
I had two different mirrors that I broke to make the finished product-one was about 1/4″ thick and the other was slightly smaller.
I have a question. How do you clean the mirror later? Especially with the different thicknesses in the glass. Do you have a certain method or is it as difficult as it seems it would be to me??
I hardly ever have to clean it. when I do, I spray a little vinegar/water mixture on a microfiber dust cloth and wipe across the whole thing lightly. In the four years I’ve had it up, I’ve cleaned it four times and it still looks sparkly!
Do you think it would work it you had a big mirror, glued it to the plywood and before the glued dried took a hammer to it and broke it that way? i was thinking about making one for my dining room and thought that way might be a little faster. Do you think it would work?
I thought about your idea as well, but then I thought about all the mirror shards that might pose a big problem if the clean up is less than perfect. With the bag, breaking the mirror inside, you are able to pick the pieces out of the bag, leaving the shards and mess right where it is. Of course you are going to do some kind of clean up after, but it will be a whole lot less. Anyway(this is just my thought), if you do try your way, you are more than welcome to tell me to stuff it. LOL Post pix too.
Rebecca
[…] Broken Mirror Art from recycled mirror bits and pieces. When the light hits it, the whole room shimmers! […]
Or you could spray paint the wood silver chrome, that would be neat! Maybe paint the border black or some other accent color that goes with the room.
I did this project, I first saw this idea in the background of an episode of Sex and The City. I googled the idea and found this blog. Thank you for the how toos Everyone LOVES mine. I have the background color aqua with bigger chunks of mirror pieces and spaces, plus I have a big black fram around it. LOVE IT!!
I would love to do this project! How much larger was your plywood piece than the mirror (before you broke it)? Thanks for your help!
The plywood was approximately 4 ft wide by 2 1/2 wide. I used several different leftover chunks of mirror, collecting from my remodeling projects and from other discarded mirror projects until I had enough to fill the plywood. Basically, I became a scavenger of all things mirror.
I. Love. This.
Thank you, Sharon! So do I!
Can you post a picture of the mirror looking directly at it? I’ll be making this shortly. It is absolutely gorgeouss. Great work.
Let me know if this works for you, Tanya!
Sweet, thanks!!! I am making this as I type. Maybe I can share a pic when mine is done. The husband was skeptical at first but after seeing
my progress he is quite impressed.
So I made it but don’t know how to post my pic to the blog – maybe you just can’t. Well it’s don’t and it looks great! Thanks for the inspiration.
From a lovely reader who tried out this project on her own-with pictures!:
Here is my copy cat version. Though I love how you have a lot of smaller pieces in yours. I can’t believe how awesome this looks and it cost less than $5 to make! Just the liquid nails. Thanks for sharing your awesomeness!
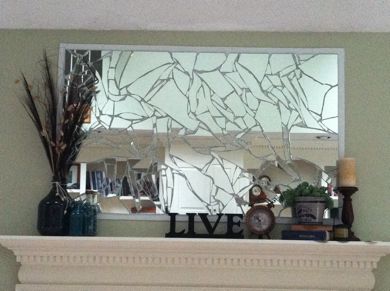
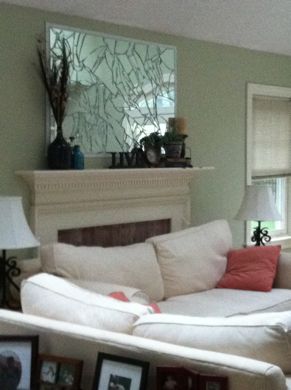
I think this turned out beautifully! Great job, Tanya!!!!
Appreciate the straight on. Even more beautiful!
[…] done this with a smaller mirror, but I would love this large, smashed mirror panel for my hall/entryway. It’s a pretty simple concept: Smash up a mirror into pieces of varying […]
looks beautiful, I had this idea in my mind a while ago but I have two small kids and Im afraid for their safty, kind of looks like very tiny pieces of glass may fall, do you think? any ideas ho to make this kids friendly???
Thank you!
Iri-
Using superglue and liquid nails keeps those pieces from falling. I’ve had ours up for four years now and haven’t had a single piece drop. Those glues are pretty strong!
Wow! Love this idea,i’ve been looking for somethig to put on my wall above my couch. This is a super neat and inexpesive idea! Thanks will start mirror huting tomorrow.
I was wondering if you think this could work on canvas. Maybe not liquid nails but something like gorilla glue? What do you think?
Laura-I’m not sure how well canvas would do. I have to imagine that the mirror chunks might become too heavy & either not attach properly and fall off or rip the canvas. That’s just my opinion, though. If you’re going to try canvas, I would start small & see how it goes first. Good luck!
Wow! this is absolutely AMAZING! ok so i REALLY want to do this!
I have two questions:
1: How long did this take to get completed?
2: Do you think if i used double sided tape that could work too? instead of the glue?
Sabrina-
It took a few hours to complete the entire project. I would not recommend double sided tape. I don’t think it would be strong enough and little pieces of sharp mirror would continue to fall and cause a hazard to you and your family. I highly recommend using a strong glue. I hope this helps!
[…] of shattered mirror, I cam across this rad mirror art idea that I just might do! Thanks Potholes and Pantyhose for the […]
That is amazing! I love it!
[…] have a broken mirror you can very easily create a piece of art for your wall decor. Rebekah from Pothole and Pantyhose is giving us the […]
COOL COOL COOL!!! Going to make this ASAP. My first thought upon seeing this was.. hummm 7 years bad luck?? But I’m willing to risk it, its so dang awesome! Your tutorial was funny too. Two thumb up! Fine holiday fun!
[…] 5. Cracked Mirror […]
I’ve made this before in high school I spray painted a corkboard and used wood glue to hold on the mirror pieces it was awesome but I no longer have it. I was looking online to see if I could buy one but this page is all that comes up. I guess I will have to make it myself again. Already anticipating cut up fingertips lol.
This is amazing! I found your post while searching for a way to salvage a mirror I got for Christmas that was accidentally cracked. My mirror is one of those giant floor mirrors that you lean against the wall. If I were to do this, do you have any ideas on something I could use as a “filler” between the broken pieces so I wouldn’t have to worry about my kids getting cut on it? Any thoughts?
Hi Rebekah! I just finished gluing my pieces down and I am now ready to hang, but I’m wondering if it’s too heavy. How heavy was yours?
[…] we adore wall arts of any kind! So, why don’t you make one by using mirror pieces? Here is a DIY mirror art project which is a perfect solution for every blank and empty wall that you have at home. It looks […]
Hi Lady!!!
I love this and will try it!!! I want to do something like this but use it with glass for a light cover/chandalier. How do you think i should go about this? Your thought and ideas would be amazing. Thanks buckets!!!
David
[…] For the full tutorial, please visit: potholesandpantyhose.com. […]
Hello from Maine, Rebekah ! The mirror project looks great – we just remodeled our bathroom completely – going to try a broken mirror piece on the wall beside the tub – your photos/details were great.
Fran
[…] Rebekah Greiman / Via potholesandpantyhose.com […]
Hi, I found you on Buzzfeed of all places! I’m actually number 18 on the list. But WOW! do I love this. It’s worth 7 years bad luck for something this stunning. If I make one and share my pictures on my website with link to instructions to your post with one image link to the post, would that be fine? Oh, my website is http://countrydesignstyle.com
Thank you.
Jeanette
Beautiful project! One question….you listed caulk in your supplies needed but there is no mention of it in your instructions or the photos. Maybe you forgot to mention the caulk or found that you didn’t need it??
I did a mosaic mirror similar to this. I glued the mirror pieces into a large timber backed oval frame, then grouted it with white grout and painted the frame white. It gets lots of positive comments. I put one very large piece in the centre so it can still be used as a mirror. Wish I could post a picture here! I’ve had it for a few years now. It fits in with any decor and I never get tired of it.
[…] The broken mirror never becomes a pile of trash. Give it a new life by carefully retrieve the pieces of mirror and arrange them on your plywood in whatever pattern you desire to create this stunning work of art. source […]
[…] The broken mirror never becomes a pile of trash. Give it a new life by carefully retrieve the pieces of mirror and arrange them on your plywood in whatever pattern you desire to create this stunning work of art. source […]
[…] The broken mirror never becomes a pile of trash. Give it a new life by carefully retrieve the pieces of mirror and arrange them on your plywood in whatever pattern you desire to create this stunning work of art. source […]
[…] sursa […]
[…] Rebekah Greiman / Via potholesandpantyhose.com […]
[…] Image Credits: Potholesandpantyhose […]
[…] Source […]
Would you please tell me what thickness of plywood you used? Also, how much does the finished piece of art weigh? Thanks! (Can you please email me the answers so I get them…I don’t know if this will notify me via email when you write back?)
[…] The broken mirror never becomes a pile of trash. Give it a new life by carefully retrieve the pieces of mirror and arrange them on your plywood in whatever pattern you desire to create this stunning work of art. source […]
[…] from Potholes and Pantyhose shares with us an easy to make Cracked Glass Mirror Project. After reading about her flowers, […]
[…] to be bad luck and most people throw them out? Well, it sounds like this cracked glass project from Potholes and Pantyhose might be just the one for you! We love the way some of the pieces are still big enough to see your […]
[…] Image source: wallpaperartdesignhd.us Get the full Instructions here: potholesandpantyhose.com […]
[…] Source: patterns, and instruction […]