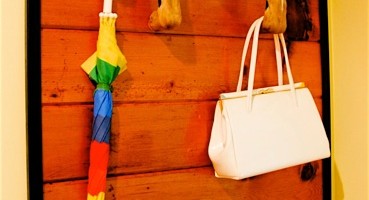
Mod Deer Hoof Coat Rack
*DISCLAIMER: I used this project awhile back as a guest blog for someone else. It caused a mild uproar when a woman commented that it was ‘gross’. If you don’t like to see the hooves of deer, please bail out now.
I would hate to gross you out. Over and out.*
I have been wanting a coat rack by our front door for a couple of years. Our guests must pile their coats on our bed, which of course becomes the perfect nesting ground for Cowboy.

I live in a part of the country where the phrase ‘He’s packing’ doesn’t mean ‘He’s preparing for a trip’.
Naturally, I thought, ‘If one can make gun racks out of deer hooves, why can’t one make a coat rack out of them?’
I searched on ebay and found five deer hooves that would be shipped to me for $5 each.

What you will need:
Wood Paneling-I bought my 3/4” tongue and groove from Habitat for Humanity
3/4” x 1” ‘L’ shaped trim
Deer Hooves
Lag Screws-mine are 2”
Epoxy
Oops Paint-I used glossy black
Paintbrush
Level
Tape Measure
Sawzall with metal blade, or a hand saw with metal blade
Skill Saw with a wood blade
Square
Drill & Drill bit a little smaller than your lag screws
Studfinder

You’ll also want a:
Hammer
Finish Nailer, Nails & Compressor (or you can use ‘brad’ nails & a hammer)

My wood was pretty damaged in several areas. I determined that I had enough to make a 30” x 34” coat rack. I marked the pieces that I wanted and drew a ‘cut’ line using my square.

Using my skill saw, I cut those suckers down and then double checked for accuracy.
I always double check myself. My accuracy tends to be unreliable. I guess you could call me ‘reliably unreliable’.

Find your studs by using a ‘stud finder’ or tapping a hammer lightly against the wall.
Starting with your top board, make sure it’s level before using your finish nailing to attach it straight to the wall and hitting the studs.
I painted my ‘L’ shaped trim black and cut the ends to fit at a 45 degree angle. I used my finish nailer again to attach the trim to the tongue and groove boards.

My deer hooves did not have a screw already mounted in them-some do. If yours don’t, clamp the heads of your lag screws with a strong table vice and use a metal bladed sawzall or hand saw to cut the heads off of the screws.
‘Off with their heads!’

Place the cut end of your lag screw into the hoof, filling the entire cavity with epoxy. Let dry for the manufacturer’s recommended time.
That is Biceps’ un-manicured hand, not mine. However, mine isn’t far from this….

Once the epoxy has hardened, give your hoof a ‘high-five’ just for good measure and to keep the neighbor’s guessing.

Using your level, mark where you would like your hooves to be attached on the wood paneling. Drill pilot holes into your wood paneling.

Screw your hooves into the pre-drilled holes and then stand back to enjoy your creation.

‘Modern-Bohemian’ is what I call it…with a touch of ‘weird-functionality’.
I hope I didn’t gross you out. Please let me know if I did…


I don’t think it’s weird or gross…everyone ‘packs’ where I’m from so I totally get it! Great job! Found you through your comment over at Hell on Heels Housewife.
[…] take it all in stride. Heck, I understand why someone on the east coast doesn’t appreciate my deer hoof coat rack. They’re worried about their patchouli and plugs. I track with why Mr. Modern Guy may not […]