Springy, Silk Scarf Shirt-Live on GDGC
This morning, I will again be LIVE on Fox23’s “Great Day, Green Country” showing how to make this Springy, Silk Scarf Shirt. I like to create many of the items I wear-this not only helps pinch pennies but prevents the awkward ‘you’re wearing the same thing I’m wearing’ at a party. This scarf shirt is inexpensive and very simple to make. 
Not only will it flatter any body type as it tapers in at the smallest point of the waist, but it will also keep you cool throughout a hot summer.
Skill Level: If I can do it, you can do it. (A.K.A. Easy.)
The robots have determined my live video can be viewed now. Enjoy. Nanu-nanu.
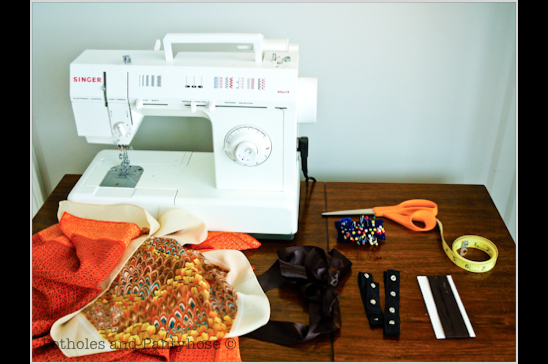
What you’ll need:
2 Scarves (approx. 2’ x 2’)
Sewing Machine
Thread and Bobbin to Match
Straight Pins
Lighter
Scissors
(2) 3″ squares and (4) 2″ squares Hem or Bias Tape, fold cut sides and iron flat
(2) 12″ sections of Craft Ribbon or Section of Snaps (like on a onesy)
(3) 2″ sections of velcro if not using snaps
(2) 18″ Sections of Craft Ribbon
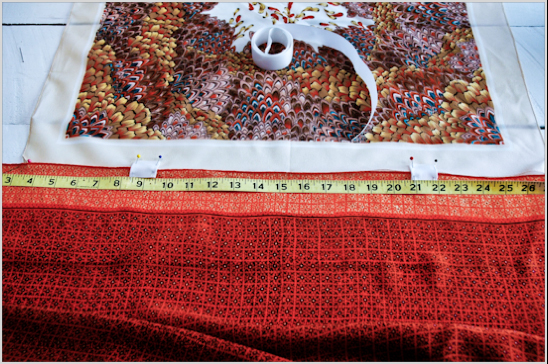
Determine which scarf will be your ‘front’ and which will be the ‘back’ of your shirt.
Lay your scarves end to end and measure the center. Pin the two pieces of 3” hem tape, 6 inches on either side of center. The area in the middle will be your neck opening.
And if you have a really big head or constantly sport a big hairdo, then widen the opening for heaven’s sake.
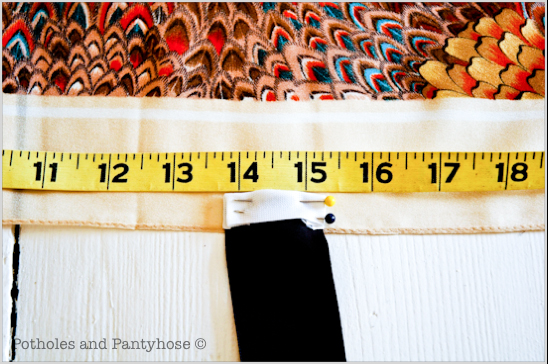
On what will be the sides of your scarf, measure 14 1/2” down. This measurement should be just above your belly button.
This will enhance the tiny part of your waist and make you look va-va-voom.
Using the 2” hem tape, pin both sections of the 18″ ribbon on the side of your ‘front scarf’ at the 14 1/2” mark.
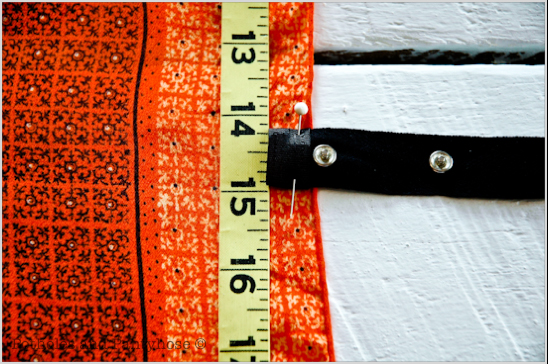
Follow the same instructions if you are using snaps, pinning them onto the ‘back scarf.’ If using the 12″ ribbon and velcro, sew the (3) 2″ sections of velcro along the ribbon. Use the 2″ bias tape to secure the ribbon to the back scarf.
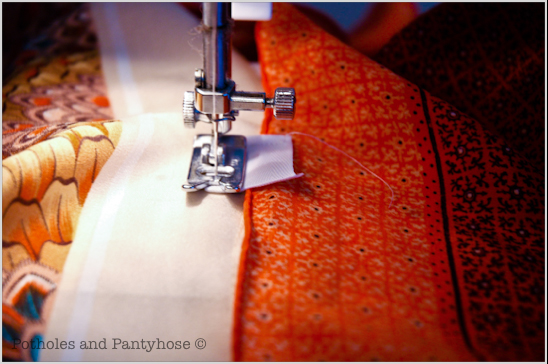
Sew everything you have pinned on with a straight stitch, making a box with the thread around the hem tape.
This ‘box’ protects the delicate nature of silk from tearing. And when you’ve eaten too much, you’ll be thankful for it.
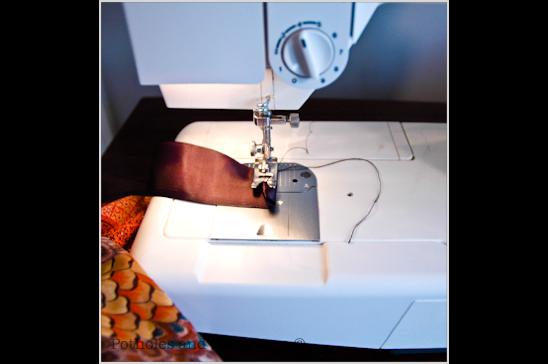
Sew the ends of the ribbon to prevent them from fraying–unless you like that worn look. Or, you can use a lighter to burn the ends which will also prevent fraying.
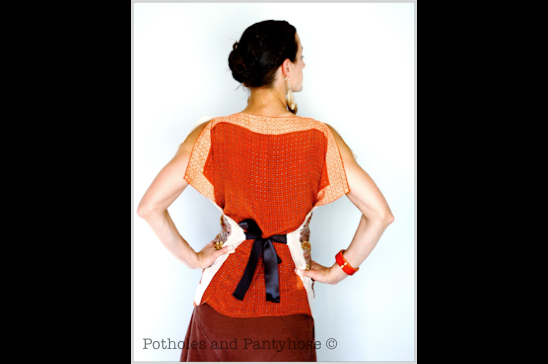
After slipping your shirt over your head, fasten the snaps or the velcro in the front around your stomach area, and tie it closed with the ribbon in the back.

It looks great paired with skinny jeans, a flowy skirt or shorts. I tend to wear bold, chunky jewelry with my scarf shirt, but I give you permission to accessorize at will.
Happy Sewing!
♥ ♥ ♥
Here are the links to my other LIVE TV appearances on Fox23’s Great Day Green Country:
- Garden Pest Deterrent Sprays
- Cheap Thrills with GDGC-Shopping Vintage
- Skinny Orange Julius
- Homemade Cleaning Products
- Homemade Beauty Products
- Homemade Laundry Items
- Homemade Dental Care
- Homemade Crockpot Applesauce
Here are links to my Homemade Household Cleansers and Beauty Products:
- Homemade Hygiene Products
- Non-Toxic Beauty Products
- Non-Toxic Cooking Spray
- Anti-Bacterial Spray
- Easy Laundry Soap
- DIY Brass Cleaner
- Organic Vegetable/Produce Cleaner
- Homemade Household Cleaners
And here are a few Homemade Food Items to easily replace store-bought items:
- Simple, Tasty Granola
- Easy Crockpot Yogurt
- Simple, Homemade Butter
- Cooking and Freezing Beans, avoiding BPA
- Homemade Hummus
- Garden Fresh Salsa
Thanks so much for stopping by and spending time with such a weirdo. Make sure you become a Facebook Fan or a Linky Follower to keep up to date with what this weirdo comes up with next. Have a great day!


Love this version of the scarf top! Super easy but super stylish. I’d love for you to stop by Etcetorize to link up. Party ends tonight but there’s a new one starting on Sunday night. (http://etcetorize.blogspot.com)
Tamara-
Thanks so much! I’ll be right over to join up with your link party. Thanks for the invitation!
Absolutely beautiful!
Thanks Leigh Ann-you are always such a sweet commenter. You make me smile!
Wow! This is such a cool idea! It looks like something you’d find at a fancy boutique!
Ooh la-la! Thank you, Lisa!
Great now my scarf collection is going to multiply by a million now that I will be looking for scarfs that go together to make shirts out of. Thanks!
🙂 Really, it’s beautiful and classy.
Thanks so much! I already have three of these shirts in my closet. Once I got started, I couldn’t stop!
This is amazing! And I do believe that I will be making this. Thank you so much for linking your ideas and for being a loyal follower. Love your ideas, Rebekah!
Gay
itsahodgepodgelife.blogspot.com
Thanks, Gay! I’m so glad you like the shirt. And you bet your booty I’m a loyal follower! You can’t get rid of me!!!! Hahahah.
I have just 1 word: AWESOME.
Thanks! I’m so glad you like the shirt. Woo hooo!
That is so pretty…and flattering on you! And your site crashed? Do you know what happened? I was reading your guest post over at HoH and she said you had another blog a while back and it crashed and you had to start from scratch… This is a different crash, I take it? I’m working on moving to WordPress and hearing sites crashing gives me the heebie-jeebies….
Gwen-
It’s funny that you commented this morning. I was just telling my hubby about you and how funny your comments were last night! YOU ARE IN MY HEAD!!!
I had the same titled blog hosted by MAC and I created it in IWeb. The problem was that I was trying to make a dinky program like Iweb function like a $6,000 site or something. I added to much info or something and it’s tiny brain couldn’t handle it anymore. Allison and her hubby from HOH tried to help me export/import into a WordPress platform-but stuff was so messed up from Iweb, it wouldn’t work. So, I literally had to cut and past all the text, download each separate picture and rewrite every post I had ever done for the past year.
Wordpress has been wonderful-my web guy amazing, and I’m pretty happy with what WordPress has done for me. I wish I could add a few more pretties, but that will come with time and a bigger budget!
Okay, this is adorable! Just found your blog through your guest post on HoH and I have to say- you are so talented!
Kendall
{songbirdsandbuttons.blogspot.com}
Seriously amazing! I just read your guest post at HOH and I was hooked once I saw your love of the broken mirror….this shirt is just icing on the cake! Excited to be following your journey!
Beautiful – and what a great, simple idea. I’ll definitely be giving it a shot!
Rebekah,
Terrific idea ; too bad I don’t have a waist. 🙁
Maureen
Wow, what a neat idea! So glad you shared at Shine on Fridays this week!
Hi Rebekah! I’m featuring this project over at Etcetorize this week. Stop by and grab a featured button from the sidebar if you like. Thanks so much for sharing last week~
Tamara-
Thanks! I feel so honored. I’ll be right over!
I love it, Rebekah! Great job!
Love this scarf shirt! What a fabulous idea and a great tutorial!
I would love if you came over and linked this project to my weekly Round Tuit party at:
http://jembellish.blogspot.com/
Have a great week!
Jill @ Creating my way to Success
That is gorgous. I am just loving the style and the scraf you used is beautiful. ~Kimberlee, The Spunky Diva
Thanks for linking to Take-A-Look Tuesday – you were featured today!!
–Mandy, http://www.SugarBeeCrafts.com
Mandy-Thanks! I’ll check it out right now! WOo HOO!
Found you via We Did It Wednesday. What a great idea! I love the shape it creates.
Rebekah, thank you very much for placing this post at Natural Mothers Network’s linky: Seasonal Celebration! You helped make Seasonal Celebration a wealth of intelligent, creative and resourceful information and it’s been such a pleasure for me and many others to read through each post . I am really looking forward to seeing you again Sunday evening or Monday! Rebecca x
Rebecca-
I’ll be there, don’t you worry your pretty head!
Adorable and very creative. I remember something similar to this in the 70’s…I think we used bandanas. Lovely.
Wow, you are the best at coming up with fun things to make. This is one of them that I really like. Clever and easy peasy. Thanks for the tutorial. I have not seen this before.
Hugs, Jeanne
Clever woman. I’m at the cover the top of your arms stage in my life, but I still think this would be fun to wear. Love the colors.
Thanks for linking up to Show your Stuff! you are always welcome to come back.
visiting via a link at sewcando blog… thanks for posting this tutorial… looking fwd to trying it! 🙂
[…] Such a pretty scarf-turned-shirt makeover from Potholes and Pantyhose. […]
I love this! I would love to feature this on Reduce, Reuse, Upcycle. Feel free to stop by and grab a featured button. Thanks!
Go for it Rachel! I’ll be by to grab a button. Thanks!
Hi,
Great top! Love it. I have a question: Why are the snaps needed? How are they used on the shirt. I guess this wasn’t clear to me in the directions.
Thanks!
Susan-
Here’s what I use the snaps for-it was in the post, but down at the end. You snap them around your tummy, the ribbon ties around your back.
After slipping your shirt over your head, fasten the snaps in the front front, and tie it closed with the ribbon in the back.
I still don’t get the idea for the snaps….I see that they are supposed to be snapped around your stomach (under the scarf) but what’s the actual point…more stability? Does it gather the waist more? If you needed to adjust it wouldn’t you just tie the ribbon in the back looser or does that throw everything off. From all the other posts I see Rebeka and I are the only ones that don’t get it.
Marianne-
The snaps gather the waist and provide adjustability, yes. But they also keep the back of the shirt from flopping open. If it’s just tied from front to back, the back of the shirt is loose and able to expose those areas we want to keep private!
Rebekah, sorry to beat a dead horse, but I don’t get the necessity for the snaps or where they are placed. Why would the back flop open? You are tying it securely. We used to make these tops in the sixties and seventies and didn’t u se the bias tape either. I do love th idea of cinching the waist in ith the ribbon. Looks great on you. Thanks for posting. A seamstress for over 53 years I love the idea of making something for something else.
Disco Dotty-
The snaps attach to the back scarf and go around the front of you, basically around your stomach. Without the snaps, the back piece is unsecured. The ribbons attach to the front scarf and tie around your back side.
The bias tape prevents the delicate silk from tearing. Hope this helps!!
Thinks!! It’s really beautiful and different from the others silk scarf shirt! All my friends will be jealous!!! So happy!!
[…] Springy, Silk Scarf Shirt is the perfect answer for a wintery wardrobe. And, it’s so easy & cheap to make […]
http://inspirationrealisation.blogspot.it/2012/05/wear-scarf-and-diy-round-up.html
I linked back to this tutorial in a round up DIY with scarves: I hope you don’t mind!!!
Love this top, so flattering!!
Xox, d.
I don’t mind at all! Thanks for the linkup!
How can I access the results of your “DIY with scarves?” I have several lovely long, wide fringed silk scarves that I would LOVE to fabricate into something I could actually wear – like a ponch, jacket, etc.
I love it!! I can’t wait to make my own!! thanks for sharing this amazing idea…
Hey. I am still confused about the snaps. I don’t understand the placement and use. Any help would be apprieciated. Thanks
The snaps attach to the back scarf and go around the front of you, basically around your stomach. The ribbons attach to the front scarf and tie around your back side. Hope this helps! Let me know if you need more help. I aim to please!
Thanks. I think I finally get it. ;). Beautiful shirt btw
Rian-
I could send you some more pics if that would help, too. Let me know-it’s no problem at all!
I have oodles of scarves, so this should be a fun project. I’m posting it on my Pinterest site too so I can find it again when I have time to do it. Thanks, Rebekah
Hello. Really neat – scarf made into a nice top! Nice site , too! I do a lot of art and crap, but I don’t look very beautiful doing all those like you. I wish I can. LOL.
You are too kind, Isabel. You don’t see what I look like while sewing-usually I am in workout shorts and some weird shirt that’s easy to get on/off while I fit my project on me a million times. My hair looks like a fan was permanently installed above my head, I am without makeup and pretty sweaty-my office gets hot. But, hey-thanks for thinking I look beautiful. That’s super sweet!
Rebekah, I, too, am having trouble understanding how the snaps are used. Would it be possible for you to include the extra pics on the website (or send photos to me, too – as you offered in answer to Rian.) I have a slew of silk scarves – have tried to give away some that are absolutely beautiful, but all my friends say they have the same problem: too many scarves! For those of us who ‘don’t have a waist/’, couldn’t we just omit the ties altogether and let the shirt hang free, like a tunic? I understand about the need for the tape – if you’ve ever worn silk you know that the seams pull apart easily.
Thanks for sharing your idea – I love recycling everything, especially fabric!
Rachel-
I’ll take some pics asap and add them to the tutorial. I was trying to cut down on the pics so that the tutorial wasn’t super long-maybe that was a bad choice! As soon as hubby gets back from fighting these dang wildfires in OK, I’ll get on it!
[…] my favorite project inspirations-like my Scarf Shirt. (Learn how to make this Scarf Shirt […]
Rebekah, where can I find scarves like yours? I was just now thinking this might actually be a cool thing to wear even when pregnant! Cool and flowy, just what I need!
This is a really great idea for a shirt and it looks so pretty!
I find most of mine at thrift stores or at Cheap Thrills in Tulsa-which is on 15th, in between Lewis and Harvard. Let me know if you have any questions!
HOOOOW Adorable! Love this…off to watch your video. Way to go Girl!!
Beautiful pattern, well-designed and wonderfully creative. Suggest going to thrift stores, VofA, Goodwill stores to pick up scarves – amazing what is available .
Do you, or any of the talented and creative participants on your website have patterns for shawls/shrugs/jackets/ponchos crafted from those lovely LONG, WIDE scarves with beautiful fringes (my kids have given me a number of them, and the fabrics and fringes are gorgeous) but I am a short, stocky, busty granny – the scarves don’t stay on me, and they don’t look very flattering.
At Art and Craft shows, I have occasionally seen some lovely draped tops made from the scarves, but have never been bold enough to ask a retail artist to share her pattern.
Connie,I have been looking for scarves like this forever. Can’t find them anywhere ,been wanting to make some of these for my Florida living daughter,any more idea’s. Thank you for any help.
[…] Making a top from 2 scarves and a ribbon by Rebekah at Potholes and Pantyhose. […]
Hi!This is such a great idea and your tutorial is really clear. I run a challenge for creatives at my blog http://www.achelois.co I hope you don’t mind but I have featured your tutorial as inspiration for our Summertime challenge with a link to this blog post. You might want to share my blog post since it will hopefully be driving some traffic to your site http://achelois.co/2016/08/summertime-creative-loops-august-challenge/
Kind Regards
Elaine Nicholls
[…] Silk Scarf Shirt […]
This is such a cool idea! Also, congrats on the tv segment! I love how this turned out and will absolutely be trying this. Could you also tie it in the front? Ya know…… for a whole corset-looking thing?